Tag: Use Query Editor

  • Adding Data Types Within Query Editor

    Adding Data Types Within Query Editor

    If you have spent any time working in Power BI, your very first step is to, wait for it… Get Data.  Using Get Data will start loading your data into the Query Editor for Extracting, Transforming and Loading (ETL).  When you start out in Power BI it is likely that you don’t spend much time in the Query Editor.  However, the longer you use Power BI desktop, and the more you learn, you find that the Query Editor is highly under-rated.  There are so many amazing transformations that you can perform on your data.  After some time getting comfortable you’ll be building larger queries with many, many, steps.  Eventually, it may look something like this:
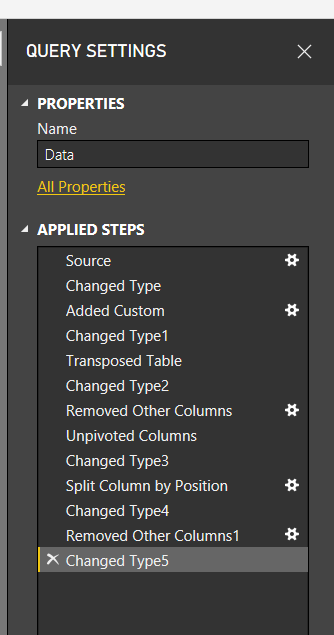
    Multiple Query Transformations
    Multiple Query Transformations

    Perhaps your queries are already long, or may be even longer.  Wouldn’t it be nice to shorten the number of steps?  It would make it easier to read.  In this tutorial we are going to talk through how we can combine several steps when you create a new column.  This is achieved by modifying the M scripts or equations slightly when new columns are created.

    While doing this won’t cut down every query in half, but it will remove a couple of additional steps per query.  This makes your queries easier to read and maintain.  Also, using this best practice, will save you headaches in the future.  At some point you will run into a data type error.  This is seen when you try to join multiple tables on columns with different data types, or when you need a measure to create a SUM but the column data type is still text.

    Let’s get to the tutorial.

    Open up your Power BI Desktop program and on the Home ribbon click Enter Data.  Using the dialog box for entering data enter the following table of data:

    Sales
    100
    120
    94
    20
    80

    Once you’ve entered your data the Create Table screen should look like the following.  Be sure to name your table, in this case I named my data table Data…. yea, feeling a lack of creativity today.  Next, click Edit to modify the query before loading the data into Power BI.
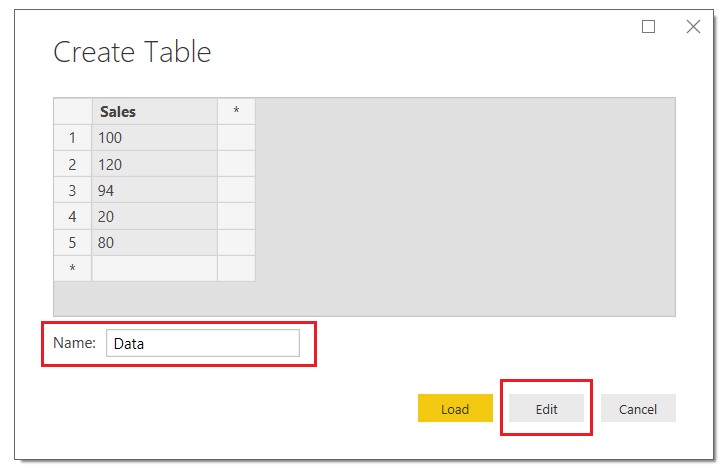
     

    Create Table
    Create Table

    This will open the query editor.  Click on the Add Column ribbon, then select Custom Column.  The Custom Column dialog box will open.

    Note: When you bring in the created table that the Sales column already has the data transformed into a whole number. Also note in the right under Applied steps we have two steps, one for the source and one for Changed Type.  This is because not every M equation (M language is the language used to perform the ETL in the query editor) can handle data types.  
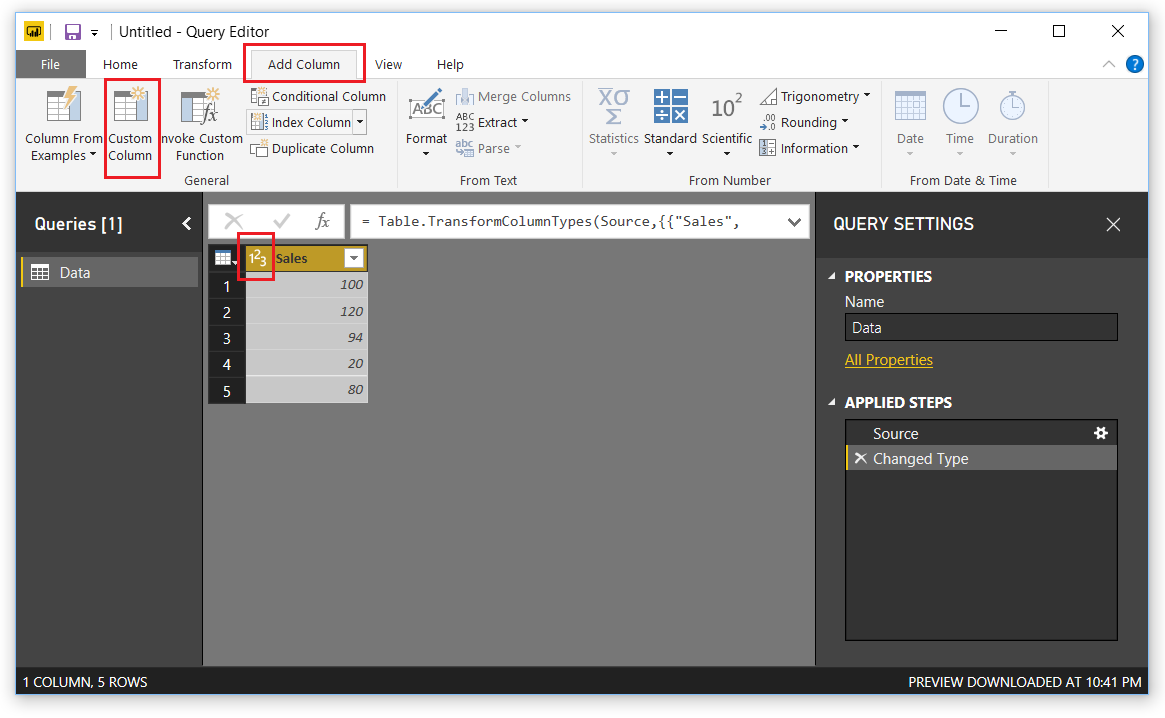
    Add Custom Column
    Add Custom Column

    In the Custom Column dialog box enter the following, the column name, the equation below.  Click OK to add the column.
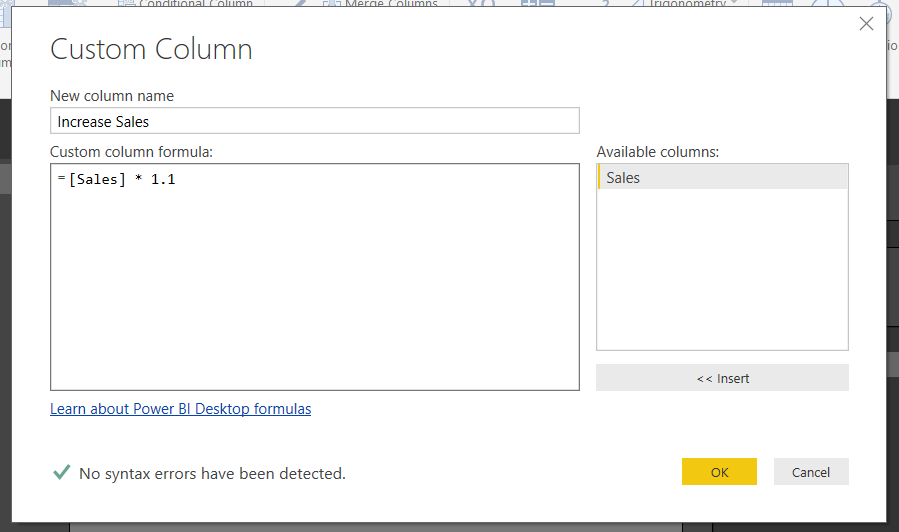
    Insert Custom Column
    Insert Custom Column

    Note: It is good practice to name the new column something meaningful.  This helps when you are working in the query editor.  When you come back to your query months later and wondered what you were creating, the column names will help!  Trust me I learned this lesson the hard way… 

    Great, now we have our new column.  Notice the image in front of our column named Increase Sales.  This means Power BI thinks that the data type of this column could be Text or a Number.  Let’s change it.  Click on the ABC123 icon and select Whole Number.  Now the column data type has changed to numbers only.
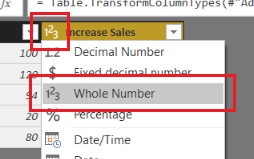
    Change Column Type to Whole Number
    Change Column Type to Whole Number

    If we glance at the Query Setting under the Applied Steps, we now have 4 steps.  Two were added, one for the added column and the second for the data type of the column.  This is not what we want.  Instead we would like the column to be added with the appropriate data type right from the beginning.

    Let’s remove the very last step labeled Changed Type1.  To do this we will click on the little X next to the step.  This will remove the step.  While highlighting the Added Custom step click in the formula bar and modify the equation to include the following statement in RED.  Press the Enter to execute the new formula.

    = Table.AddColumn(#"Changed Type", "Increase Sales", each [Sales] * 1.1, Int64.Type)

    Note: if you don’t see the formula bar it can be toggled on or off in the View ribbon in the check box titled Formula Bar.

    The query editor should now look like the following:
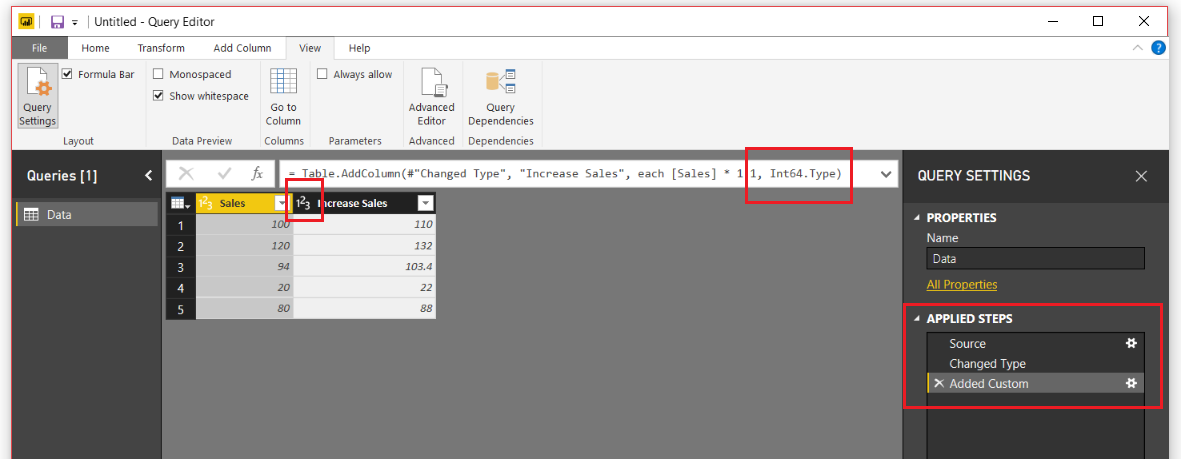
    Desired Data Type
    Desired Data Type

    Without adding an extra step on the Query Settings, we have changed the data type.  I know this might seem trivial, but when you are creating large queries, they can get difficult to read.  For me, I find this technique quite useful, and it doesn’t only support whole numbers.  This technique also supports the following data types:

    Data Type Syntax
    Whole Number Int64.Type
    Decimal Number Number.Type
    Dates Date.Type
    Text Text.Type

    Thanks for following along.  If you liked this tutorial, please share it with someone else who might find this valuable.  Be sure to follow me in LinkedIn an Twitter for posts about new tutorials and great content from PowerBI.Tips

    Linkedin Twitter
  • Using Variables for File Locations

    Using Variables for File Locations

    This week I encountered an issue when working with multiple queries in my data model.  Here is the source files in case you want to follow along.

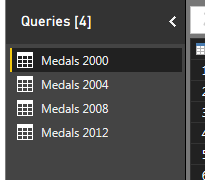
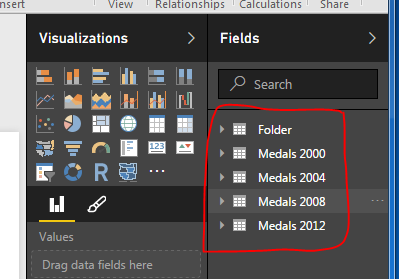
    Here’s what happened.  I had a PBIX file that had four queries in it, one file for the summer the Olympic metal count for the following years, 2000, 2004, 2008, and 2012.


    Olympic Metal Count
    Olympic Metal Count

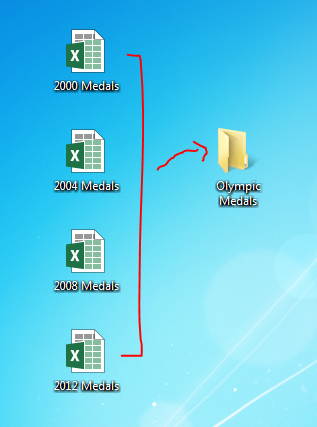
    After a bit of working I figured that my desktop screen was going to get to cluttered if I continued to collect Olympic metal data.  Thus, I moved my excel files which were my source data into a folder called Olympic Medals.

    File Move
    File Move

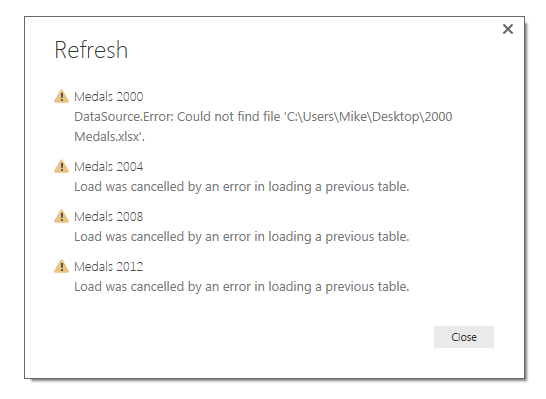
    By doing this I broke all the links for all four files.  This was discovered when I tried to refresh my queries and noticed that all the queries failed. Power BI gave me a nice little message notifying me that there was a data source error.

    DataSource.Error: Could not fine the file:
    Missing File Error
    Missing File Error

    To fix this I had to open the query editor and change each file’s location to the new folder that I just made.  Seeing that this is not an efficient use of my time, I decided to spend more time to figure out a way to make a variable that would be my file location for all my queries.

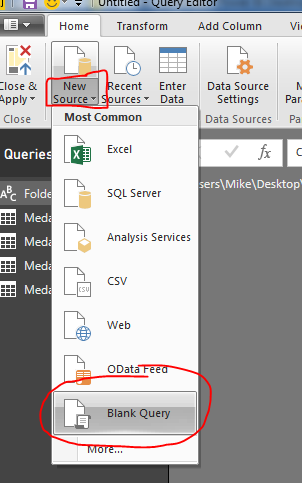
    Lets begin by making a new blank query by clicking on the bottom half of the New Source button on the Home ribbon.  Then click the item labeled Blank Query.

    Start Blank Query
    Start Blank Query

    With the new query open type in the file location where you will obtain all your working files.  For me my file location was on my desktop, thus the file location is listed below.  Rename the new query to Folder.

    Folder Query
    Folder Query

    Note: Since we are working on building a file structure for Power BI to load the excel files you will want to be extra careful to add a “\” back slash at the end of the file location.

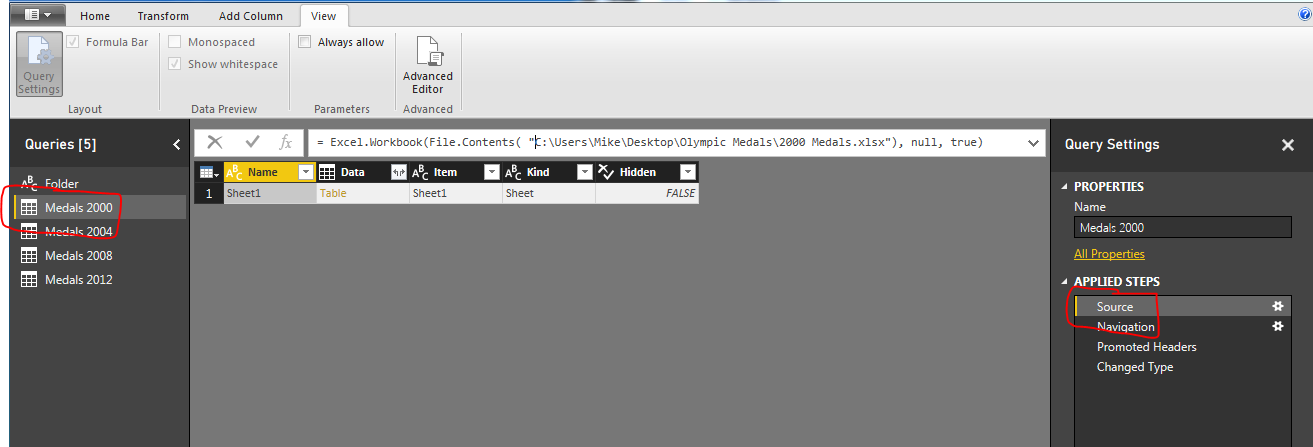
    Next on the query for Medals 2000, we click the Source under the applied steps window on the right.  This will expose the code in the formula bar at the top of the window.

    Select the Source Applied Step
    Select the Source Applied Step

    Note: If you don’t see the formula bar as I have illustrated in the image above, you can turn this feature on by click the View ribbon and checking the box next to the words Formula Bar.  This will expose the formula bar so you can edit the source step.

    This is where the magic happens.  We can now insert our new blank query into this step.  Our current file contents looks like the following:

    = Excel.Workbook(  File.Contents(  "C:\Users\Mike\Desktop\Olympic Medals\2000 Medals.xlsx") ,  null ,  true )

    Now remove the first part of the file location and make the equation match the following:

    = Excel.Workbook(  File.Contents(   Folder  &   "2000 Medals.xlsx") ,   null , true )

    Not only does this shorten our equation, it now uses the folder location we identified earlier and then we can pick up the file name 2000 Medals.xlsx.  This makes is very easy to add additional queries with the same steps.  Also, if you move your files to a new folder location, you only have to change the Folder query to reflect the new file location.  To test this make a new folder on your desktop called New Folder.  Move all the Olympic medal files to the new folder.  Now in Power BI Desktop press the Refresh on the Home ribbon.  This should result in the Data.Source.Error that we saw earlier.  To fix this click the Edit Queries on the Home ribbon, select the Folder query and change the file directory to the new folder that you made on your desktop.  It should look similar to the following:

    New Folder Image
    New Folder Image

    Once you’ve modified the Folder query, click Close & Apply on the Home ribbon and all your queries will now reload.  Success!!

    New Queries Loaded
    New Queries Loaded


    Hope this tutorial helps and solves some of the problems when moving data files and storing information for Power BI desktop.  Please Share if you like the tutorials. Thanks.

  • Query Editor – Editing M Code

    Query Editor – Editing M Code

    In this tutorial we’ll learn how to copy and paste queries to and from the Query Editor.  When your working in Power BI Desktop often you will need to share and model the data before it can be applied to the visual.  In my experience you’ll need to add a calculated column or break out a date such as 1/5/2016 into the the Year 2016 or Month 01, components to properly display a visual.

    We will start off with from a prior example where we build a shaded region map.  The tutorial to create this Power BI Desktop file is located here.

    If you want to cheat and download the final PBIX file you can download and open the zipped file here: Regional Filled Map Example

    This file was made in Power BI Desktop April 2016 version, 2.34.4372.322, download the latest version from Microsoft Here.

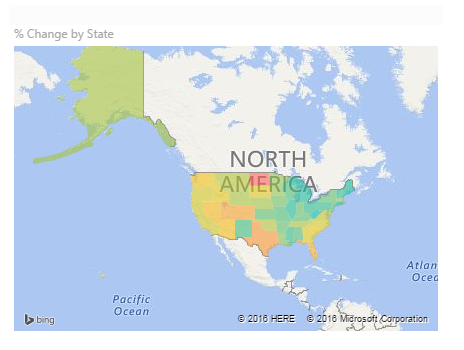
    Open the zip file that you downloaded and extract the file inside labeled Regional Filled Map Example.  Open the file.  Once you’ve opened the file on page 1 of the you see a map of the united states that looks similar to the following.

    Opened File with Map
    Opened File with Map

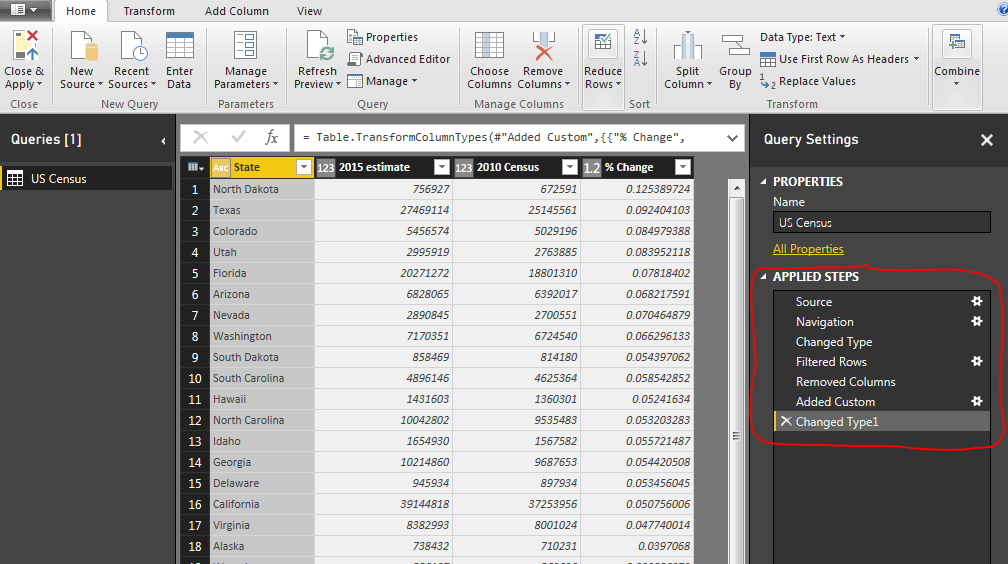
    Now we well enter the query editor.  Click on the Edit Queries on the Home ribbon.  You opened the Query Editor.  In this window we shape and model the data so we can properly visualize it on the pages.  Couple of things to notice here.  Every time you press a button on the ribbon, the query editor generates an Applied Step.  Each step writes a line of M code which transforms the data as it is loaded into the computer’s memory.   In this case we have (7) seven steps starting at Source  and ending with Changed Type1.

    Query Editor Revealing Applied Steps
    Query Editor Revealing Applied Steps

    We want to expose the code that is begin generated at every step behind the scenes.  Click on the View ribbon and then click on the button called Advanced Editor.

    Query Editor - Advanced Editor
    Query Editor – Advanced Editor

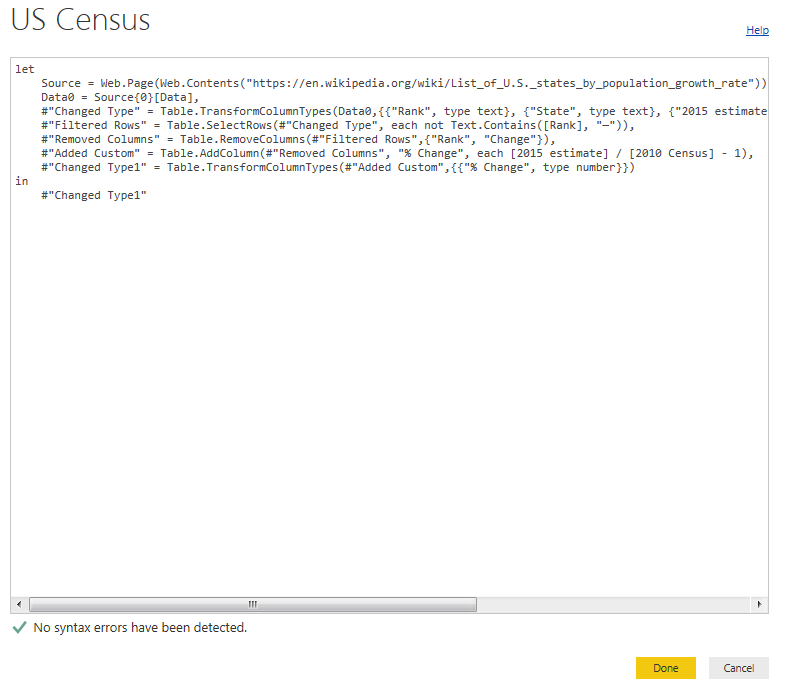
    Opening this window reveals the M language code that is generating each Applied Step we saw earlier.

    Note: some of the steps we saw earlier such as Filtered Rows had a space in it. In the query editor any applied step had a space in the name gets the added #”” around the applied step name.  Thus, in the query editor Filter Rows would be #”Filtered Rows”.  The hashtag and the quotations define the complete variable.  If you changed the name of the applied step to FilteredRows, with no space.  In the Advanced Editor you’d only see the step labeled as FilterRows, no hastag or quotations needed. 

    Now that the M language is revealed you can made modifications to the code.  In cases where you want to make a function you would do so in the Advanced Editor.  For our example today select all the code and copy it to the clipboard using the keyboard shortcut CTRL+C.  Click Done to close the window.

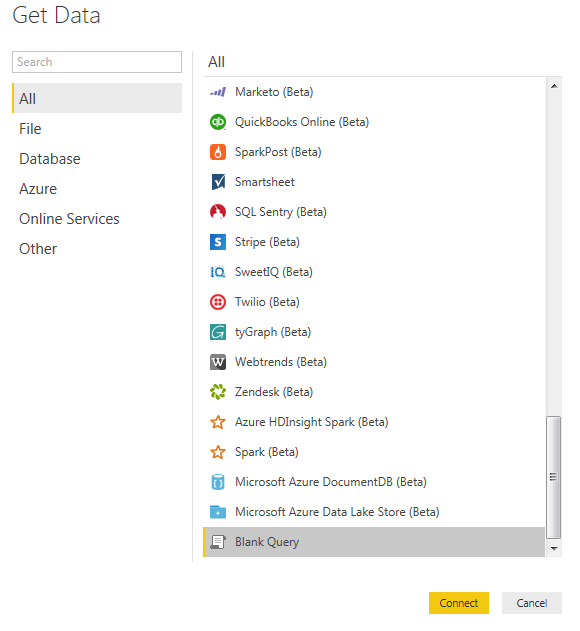
    Now lets copy that code into a brand new query.  Click the Home ribbon, then click New Source, scroll all the way to the bottom of the list and select Blank Query. Click Connect to start a blank query.

    Get Data - Blank Query
    Get Data – Blank Query

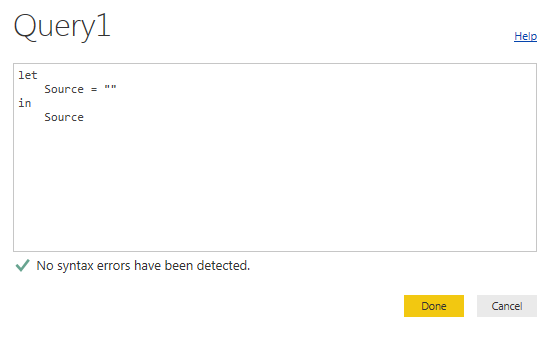
    A new Query will now open up.  Click the View ribbon, then click Advanced Editor.  A blank editor window will open.

    Blank Query
    Blank Query

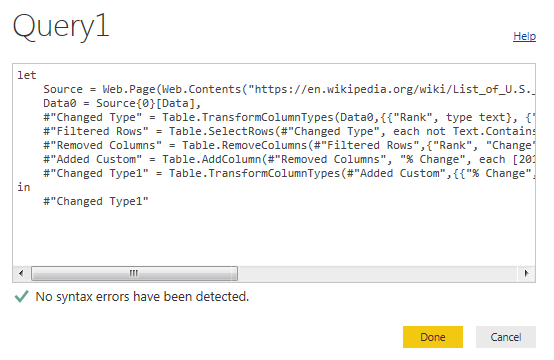
    Paste the code we copied earlier into this window.  Now the new Query1 should look like the following:

    Paste Code in to Advance Editor
    Paste Code in to Advance Editor

    Click Done and the new query will now load.  It is that simple, now we have two identical queries.