

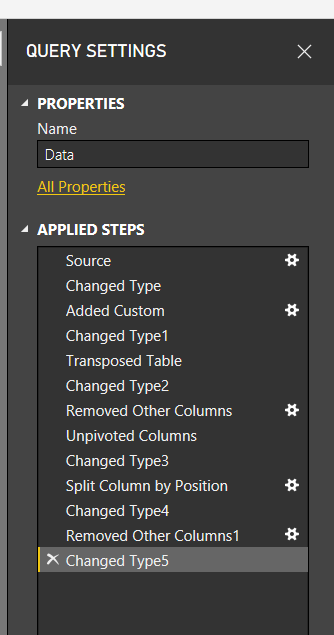
If you have spent any time working in Power BI, your very first step is to, wait for it… Get Data. Using Get Data will start loading your data into the Query Editor for Extracting, Transforming and Loading (ETL). When you start out in Power BI it is likely that you don’t spend much time in the Query Editor. However, the longer you use Power BI desktop, and the more you learn, you find that the Query Editor is highly under-rated. There are so many amazing transformations that you can perform on your data. After some time getting comfortable you’ll be building larger queries with many, many, steps. Eventually, it may look something like this:
Perhaps your queries are already long, or may be even longer. Wouldn’t it be nice to shorten the number of steps? It would make it easier to read. In this tutorial we are going to talk through how we can combine several steps when you create a new column. This is achieved by modifying the M scripts or equations slightly when new columns are created.
While doing this won’t cut down every query in half, but it will remove a couple of additional steps per query. This makes your queries easier to read and maintain. Also, using this best practice, will save you headaches in the future. At some point you will run into a data type error. This is seen when you try to join multiple tables on columns with different data types, or when you need a measure to create a SUM but the column data type is still text.
Let’s get to the tutorial.
Open up your Power BI Desktop program and on the Home ribbon click Enter Data. Using the dialog box for entering data enter the following table of data:
| Sales |
| 100 |
| 120 |
| 94 |
| 20 |
| 80 |
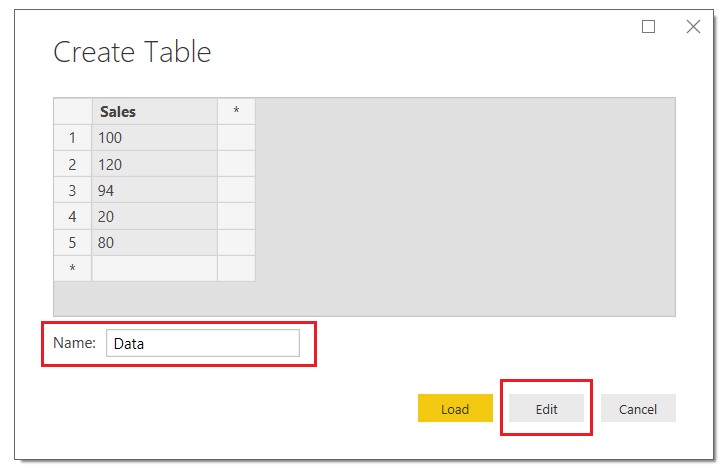
Once you’ve entered your data the Create Table screen should look like the following. Be sure to name your table, in this case I named my data table Data…. yea, feeling a lack of creativity today. Next, click Edit to modify the query before loading the data into Power BI.
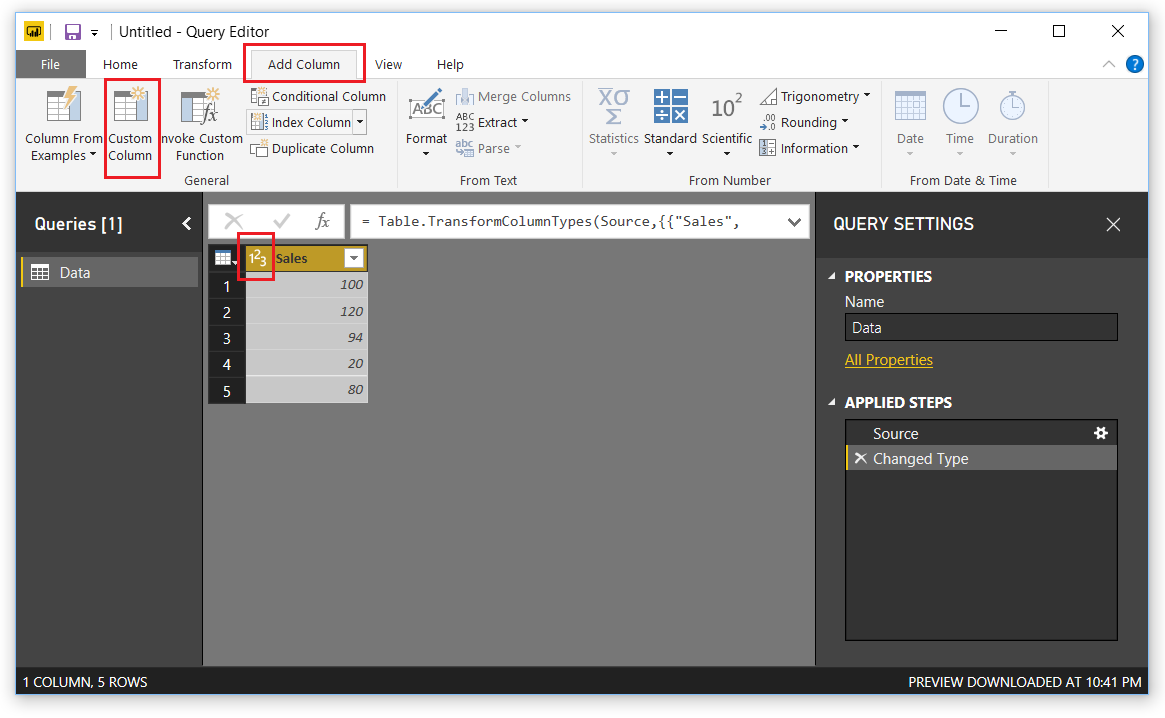
This will open the query editor. Click on the Add Column ribbon, then select Custom Column. The Custom Column dialog box will open.
Note: When you bring in the created table that the Sales column already has the data transformed into a whole number. Also note in the right under Applied steps we have two steps, one for the source and one for Changed Type. This is because not every M equation (M language is the language used to perform the ETL in the query editor) can handle data types.
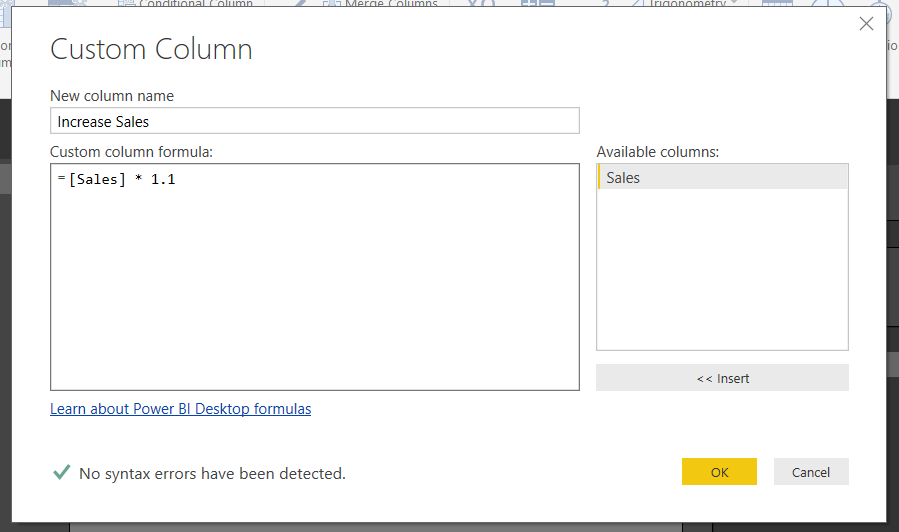
In the Custom Column dialog box enter the following, the column name, the equation below. Click OK to add the column.
Note: It is good practice to name the new column something meaningful. This helps when you are working in the query editor. When you come back to your query months later and wondered what you were creating, the column names will help! Trust me I learned this lesson the hard way…
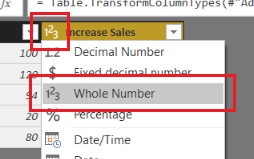
Great, now we have our new column. Notice the image in front of our column named Increase Sales. This means Power BI thinks that the data type of this column could be Text or a Number. Let’s change it. Click on the ABC123 icon and select Whole Number. Now the column data type has changed to numbers only.
If we glance at the Query Setting under the Applied Steps, we now have 4 steps. Two were added, one for the added column and the second for the data type of the column. This is not what we want. Instead we would like the column to be added with the appropriate data type right from the beginning.
Let’s remove the very last step labeled Changed Type1. To do this we will click on the little X next to the step. This will remove the step. While highlighting the Added Custom step click in the formula bar and modify the equation to include the following statement in RED. Press the Enter to execute the new formula.
= Table.AddColumn(#"Changed Type", "Increase Sales", each [Sales] * 1.1, Int64.Type)
Note: if you don’t see the formula bar it can be toggled on or off in the View ribbon in the check box titled Formula Bar.
The query editor should now look like the following:

Without adding an extra step on the Query Settings, we have changed the data type. I know this might seem trivial, but when you are creating large queries, they can get difficult to read. For me, I find this technique quite useful, and it doesn’t only support whole numbers. This technique also supports the following data types:
| Data Type | Syntax |
| Whole Number | Int64.Type |
| Decimal Number | Number.Type |
| Dates | Date.Type |
| Text | Text.Type |
Thanks for following along. If you liked this tutorial, please share it with someone else who might find this valuable. Be sure to follow me in LinkedIn an Twitter for posts about new tutorials and great content from PowerBI.Tips
 |
 |