

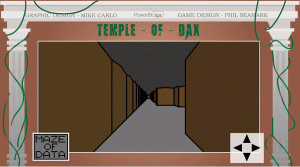
To celebrate joining the Power BI Cat team next week, I thought I would update a DAX game I built last November (2018) which was a DAX-based maze game in Power BI that allowed you to navigate a character through a series of user-created maps in a top-down view.
The details for that game are in this blog posting. http://radacad.com/fun-with-dax-a-maze-ing-dax.
The update I wanted to make was to see what is involved in creating a 3D, first-person version of the same maze. The following is how I got on.
The PBIX File for the Temple of DAX – 3D can be downloaded using this link and here is a link to the publish to web version.
Like the 2D version, the report imports a CSV file which it uses to generate the map. I pretty much used exactly the same code to import the CSV file and pivot the coordinates to a format for suitable for processing in DAX.
All you need to create/edit your own custom maps is to open and edit a CSV file using your preferred editor and place an X character where you would like a wall to be and an I character for the insight (or exit). Excel is great for this particular task as you can size and align the columns nicely to easily see where walls will be.
The following image shows the data1.csv file opened in MS Excel, with all columns set to the same width of 15-pixels. Once modifications are complete, save the file as CSV (not xlsx) in the folder the PBIX file uses to import from.

Once again, I’d like to thank Margarida Prozil for providing a custom control to manage the navigation. This is an updated version of the D-PAD called a 3D-Pad. You can grab a copy from her GitHub repo if you are keen to work with this control.
https://github.com/mprozil/dPad-3D/tree/master/dist
The control has four arrows. The Up/Down arrows move you back and forward through the map, while the left/right arrows spin you 45 degrees. This is different behaviour to the D-Pad in the 2D version of the maze.
I’d also like to thank Mike Carlo at PowerBI.Tips for providing the wonderful background image and the overall visual design of the game. It was Mikes idea for the evil laugh on the intro page. This started to drive me a bit nutty as it would play everytime I saved the file.
The Game Logic
Like the 2D game, this version uses SVG as the method to draw the graphics to the screen. Each time an arrow is clicked, a new view needs to be generated based on the interaction, so a calculated measure takes into account the new position or perspective and generates a fresh SVG to be displayed using the Image control by CloudScope.
The SVG image displayed in the Image Control is a nested set of mini SVG polygons that draw the outline of various shapes into an outer SVG file. The performance is pretty good and I have still yet to hit any limitations on text size to store the final SVG set.
The 3D world
The first challenge was to figure out how to convert coordinates in a table in the data model into an image that looks like you are walking through a maze.
The map I use in the uploaded PBIX file is 26 steps and 36 steps long, so it isn’t big. If a step has been designated as a wall, it effectively has 4 walls (panels) around its perimeter, and when a series of X values in the CSV run next to each other, a longer wall effect is created.
Each of the panels for a step in the board has 5 points. I initially created these panels as 100 x 100 walls, but I found it added the extra point at the top to help me work out which way was up when I was first playing with the 3D to 2D projection code.
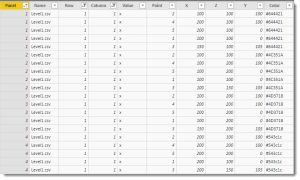
The Calculated table called 3D Worlds takes the basic X/Y coordinates from the CSV file and generates a 3D world of X/Y/Z points for every panel on every all in the maze.
The image below shows all X/Y/Z coordinates for 1 step in the CSV map. The first column shows there are four panels. Think of these as like north, east, south and a west facing wall. Each wall as five points. These five points define each corner of the wall in terms of a 3D world and the X, Y and Z columns for each row specify exactly where each point should be in a three-dimensional plane.
3D to 2D projection
The next challenge is to take the 3D coordinates and convert this information into an image that represents what you should see based on your location in the map, along with the direction you are looking. There was no way I was going to figure the maths for this out from scratch, and after a few internet searches and a bit of reading, I found this article to have all the information I needed.
https://en.wikipedia.org/wiki/3D_projection
The key information is in the section on Perspective Projection, including the algorithm I ported into the DAX measure in the game.
The basic principle is to define a 2D plane (or screen) called a viewport that sits a specific distance from the eyeball. Then an imaginary line is calculated between the eyeball and every X/Y/Z point from the 3D World table. If any of these lines pass through the viewport, they can be plotted onto the viewport at a specific 2D x/Y coordinate.
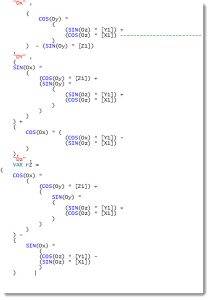
The code I used from the Wikipedia article is the following:


The Main Map calculated measure contains all the DAX code to convert the 3D data points to 2D coordinates using SVG.
The section of code in the Map Map calculation that matches first the algorithm from the Wikipedia article is here :
I’m not going to pretend to understand this any more than it reminds me of math classes from when I was 15, working out SIN, COSINE equations. I swore then I would never use them for real, so I guess I owe my old maths teacher an apology.
The good news is I didn’t need to understand the code in the end. Once I’d added it to the DAX calculated measure and started generating SVG polygons, it’s quickly looked the way I wanted.
I probably spent less than 2 hours getting this aspect of the game to work. There was a little fine-tuning while I worked out what the various elements were, but this was much easier than I anticipated.
A nested set of CONCATENATEX functions in the Main Map calculated column, loop through every object defined in the 3D World table and converts points to 2D versions. A series of filters are applied to stop plotting any graphics that fall outside the 2D viewport, such as walls that are behind you (taking into account the direction you are looking).
The objects are drawn from furthest to nearest to make sure far away objects do not appear if they are covered by a nearer object. This also means portions of further away objects will appear as expected if they can be partially seen.
Other filters are applied to stop panels of walls being plotted when they simply cannot be seen.
Mini Map
A separate Mini Map calculated measure generates a non-3D version of the map and gets added to a separate Image Viewer custom control to show your position in the map. A small red triangle shows your position and direction and a small white square shows the exit. In this case, it’s inside the letter E.
3D Dpad
Margarida Prozil supplied me with an updated 3D control that sits on the top of three separate columns in the database. X and Y (rows and columns) control the square you currently occupy, while the third column is V (for view perspective). X and Y represent how many squares wide, or long the map is. V represents the angle in steps of 45 degrees and there are 8 possible values (0, 45, 90, 135, 180, 225, 270 and 315). The example map is 26 squares wide, 36 squares long so combined with the 8 views, mean the control can be set to 7,488 possible values. A custom control can only manage about 30,000 points, so take this into account for larger custom maps.
Summary
I’m pretty happy with the 3D effect and can see it can be used with other X/Y/Z based 3D coordinates plotted to a 2D view plane. When I was debugging this, I had slicers for height on the screen so I could use a slider to create an effect of flying up in the air – and the maze still rendered as expected. Power BI seems to cope with the workload pretty well, despite not really optimised for this kind of work. In future versions, I may add more objects and detail to push the engine harder and see where breaking points are.
There probably aren’t too many business use-cases in Power BI for this type of report aside from educational. Feel free to have a look through the PBIX file where you may pick up some useful ideas, tips and tricks in the DAX.
There is a small bug at the start of the game when the bookmark drops you into the maze and you need to click the up arrow a few times to get going. Once you are on your way, it’s pretty good. I’ll try to get that resolved in the next few days.