Dynamic Visuals using Buttons

Visuals with Button and Tabs

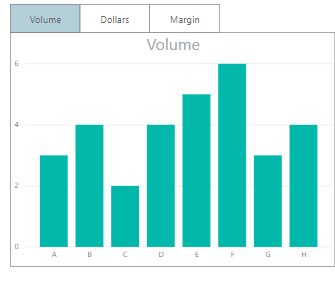
Sometimes, we want the users to see different metrics, but do not want to take up too much space on our page. The scenario we are going to walk through is how to build just one visual (in this case a bar graph). It will include a toggle that allows the user to select their desired calculation, either the sum of Volume, Dollars or Margin.
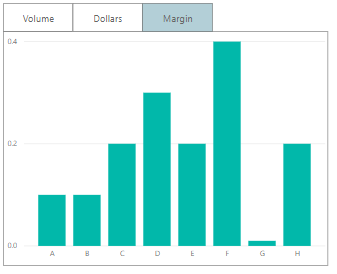
Final Solution

With buttons, we can change specific visuals on a page. Recently, with the release of conditional formatting on titles and backgrounds, we have some new methods to make this easier for the report author and cleaner for the report consumer.

The Build

Before we start, turn on the selection pane and bookmark pane. They can be turned on by clicking on the View ribbon and checking the correct boxes.

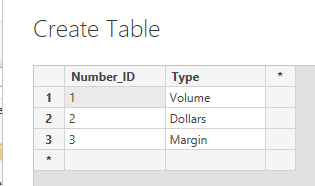
First, we’re going to create our control table. This will be a disassociated table. This table should not have any relationships to any of the other tables in our model. We just need to enter a numeric ID and a description of what we want.  Click on the Enter Data button found on the Home ribbon. Enter the following data as shown. Click the OK button to close the Create Table dialog box.

Now that’s set up, we can write our measure. This measure will see what is selected in the Number_ID column of our control table, then return the appropriate calculation. Use a switch statement to select the correct calculation. Create the following measure:

Selected Calculation = 
SWITCH(
  SELECTEDVALUE(Control[Number_ID])
   ,1,SUM(Sales[Volume])
   ,2,SUM(Sales[Dollars])
   ,3,Sum(Sales[Margin])
   ,SUM(Sales[Volume])
)

Note: See there is a default value listed in the switch statement. The default calculation means that if nothing is selected, SUM( Sales[Volume] ) will be returned. The default value is represented by the last property in the switch statement.

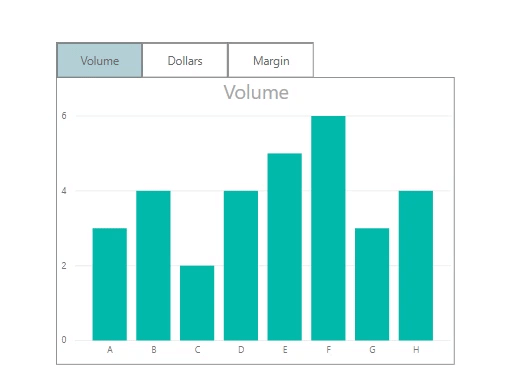
Time to set up our visual. Add a bar graph with Category on the axis and the new measure, Selected Calculation, in the values fields. Then add a slicer for the Number_ID column. The Number_ID column comes from the control table we added earlier.            

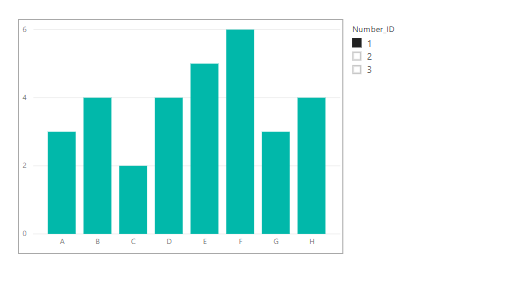
Switching the slicer can now change the graph to show the different calculations.

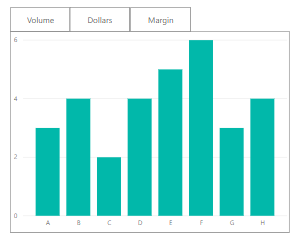
The next stage is to add three buttons to the top of the graph. In the Home tab of the ribbon, click Buttons and select Blank. Make sure the outline colors and outline width match on all objects, Buttons and chart outline.

Tip: Make sure you label your buttons in the Selection Pane. The selection pane can be turned on by clicking on the View ribbon and checking the box labeled Selection Pane. To Change the name of the button, double click the name listed in the Selection Pane. Giving a title (such as Button_Volume) will make it easily to see what visual items are on the page.

After this, it’s time to add the bookmarks.

The bookmark pane can be turned on by clicking on the View ribbon and checking the box labeled Bookmark Pane.

Step 1:

  • Select a value of 1 in the Number_ID slicer.
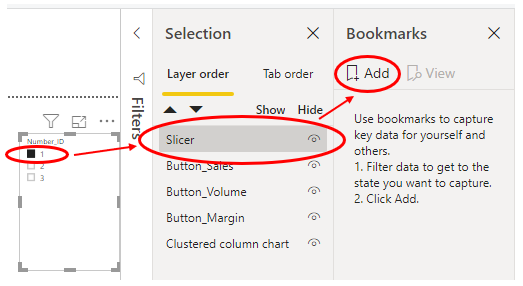
  • Select the slicer (and only the slicer) in the Selection pane.
  • Click “Add Bookmark” in the Bookmarks pane.

Step 2:

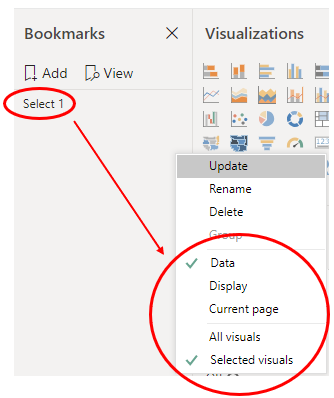
  • In the Bookmarks pane, right click the bookmark and rename it to Select 1.
  • Right click again, and untick “Display” and “Current Page”. Select “Selected Visuals”.

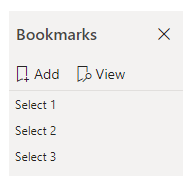
Now repeat step 1 and step 2, but do so with the values of 2 and 3 from Number_ID slicer. Name these bookmarks Select 2 and Select 3. You should finish with three bookmarks, each that filters Number_ID to a different value. You can test the bookmarks by clicking on them once in the bookmark pane.

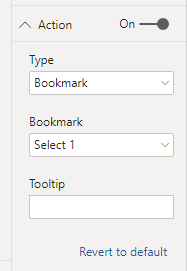
On Button_Volume, assign the Select 1 bookmark (as Number_ID 1 refers to volume). To do this, click on Button_Volume in the selection pane. In the visualizations pane for this button, go to the property named “Action”. Turn it on, change the type to bookmark, and choose Select 1 in the dropdown.

Repeat for Button_Dollars and assign Select 2. Then for Button_Margin and assign Select 3. Now the buttons can change the graph, but it’s a bit hard to see what is selected.

Add Conditional Formatting

This is where conditional formatting can help us! Select Button_Volume in the selection pane. Then in the visualizations pane, turn on the background property, select the ellipsis and click conditional formatting

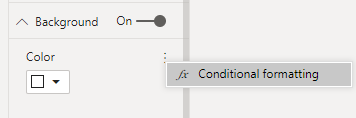
Here’s the settings we want:

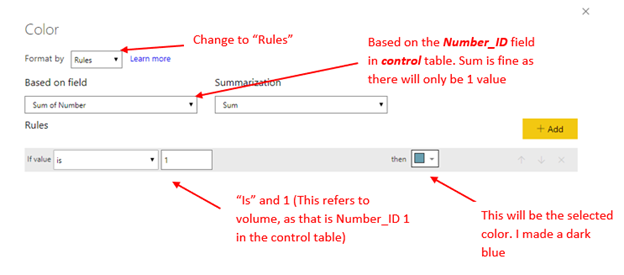
This is going to apply a rule if the Number_ID selected is 1, to give the button a blue background. As there are no other rules, any other number selected will default to the white.

Now, apply the same steps to the other two buttons, but make the rule “If value is 2” for Dollars, and “If value is 3” for Margin.

To tidy up, hide the slicer and turn the visual headers of all buttons off. You can click on the eye next to the slicer in the selection pane to hide it.

Turn the visual headers off by clicking the button, then in the visualizations pane.

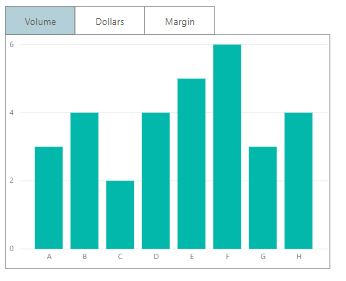
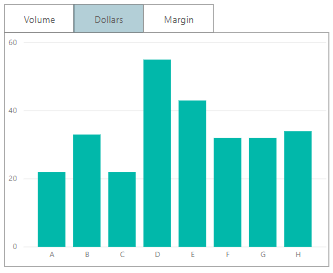
Great! Now the tab shows the selected button and correct measure:

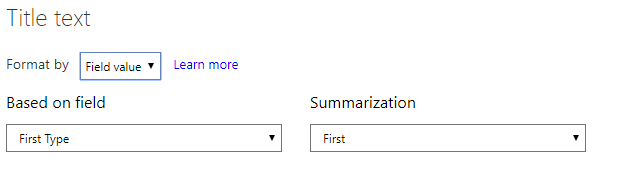
To make it even clearer, apply conditional formatting to the title of the graph. On the graph, open conditional formatting. Set it to field value and use the type field in the control panel.

Using this control table allows for greater flexibility. We can add more calculations, easily edit them or even sync across pages, all without having to re-record any bookmarks.

If you like the content from PowerBI.Tips please follow us on all the social outlets to stay up to date on all the latest features and free tutorials.  Subscribe to our YouTube Channel.  Or follow us on the social channels, Twitter and LinkedIn where we will post all the announcements for new tutorials and content.

Introducing our PowerBI.tips SWAG store. Check out all the fun PowerBI.tips clothing and products:
Store Merchandise

55 Comments

  1. Hi there,
    An alternative way is to create one table that hold the (3) results with extra column for types then one slicer that change the display eliminating bookmark. in addition to that you can create sub totals and total and store them in the same table which make power BI runs much faster
    Thanks,
    Oded Dror

  2. Thanks for the comment!

    Yes, you are right! I use the bookmarks as I think the buttons give me better options for styling and more features, and can better force a selection / stop multiple selections. Of course, it has a few more more steps, so it can depend on your use case!

    Sub totals is a great idea. Again, we have a trade off here – we may make it a little quicker but we would lose dynamic ability.

    Thanks for providing some alternate methods, I would love to hear mnore if anyone else has any!

    – Steve

  3. Hello,
    I tried to use bookmarks to show and hide filters but I had the following issue:
    after applying filter and hiding it, everything gets unfiltered again.
    Is there a way to keep the filters on?
    Thanks.

    • Hi SandraNery,
      I would check the following couple of things:
      First, make sure you have used a slicer visual, not a table. A slicer is the only way that the selection will get carried through when it is hidden. This is in the very bottom left corner of the visualizations box.
      Second, make sure that when you were recording the bookmark, you had the correct visual selected in the selection pane (it will be highlighted).
      Third, make sure you’ve assigned the correct bookmark to each button!

      Steve

      • Hi Steve,
        Thanks for the tips. I was using a Table… not a slicer visual.
        Everything else is okay.
        Regards,
        Sandra

  4. Nice solution, but isn’t it overkill?
    As presented, you could have used the slicer (but showing the description column) in horizontal format above the graph. Simpler, No need for buttons nor bookmarks (that give you more flexibility, but also much more work)

    • Hi Juan,
      Thanks for your comment – I love it when people can build on additional solutions! I use the bookmarks as I think the buttons give me better options for styling and more features, as it gives much better options to help fit in to the design of a report.
      By using buttons here, this also was about setting the groundwork for some great report features – we can expand these to use filter sets across columns or add even more features. Watch out for the upcoming blogs – we will dive deeper into this, keep your eyes peeled!
      -Steve

  5. Hello,

    Wat a very nice tip.

    I don’t understand how i can get the text in the buttons.

    With kind regards,

    Wim van der Linden

    • Hi W. J. van der Linden,
      Please:
      – click on the button
      – In the visualizations Pane, turn on “Button Text” (the first formatting feature available)
      – Type the text in the “Button Text” Box

      Thank you!
      -Steve

  6. Very helpful lesson for sharpening up the presentation of various graphs. I like the buttons over slicers all over the place.

    One quesiton: I was able to name the buttons in the Selection pane, but was unable to get the name to show up on the button as clean as your example looks. When I switched on the Title in formatting it had a line underneath it, and looked sloppy.

    • HOLD UP

      I just found the Button Text formatting. All good.

      Thanks again, good tutorial!

  7. Love seeing different ways of looking at/presenting data. powerbi.tips is one of my favorite resources.

    • Thanks for the kind words. We continue to strive to make the best content to help other data passionate people!! Thanks for being a great community.

  8. But is there a good way to do this sort of thing with the legend? I have way more cases where the measure stays the same but we want to flip the legend. Right now, I can have 4 different buttons for example tied to 4 different bookmarks. And that works if I hide/show the visuals based on the selections. But is there a way to color the background of each button to show it selected WITHOUT having to build 4 different sets of buttons?

    • Sadly there are no controls to adjust positions of the legend. This is more of a hard coded design element. Your solution of having 4 buttons with four different visuals for placements of the legend is the only way I am aware of getting this kind of flexible end user design.

  9. Wow! After all I got a web site from where I be capable of truly get valuable information regarding my study and knowledge.

  10. Hello,

    I created the measure, copy and paste it as it is, but I get an error. Do you have a sample to share? Thanks!

      • Hi Mike, great tutorial. I’ve got everything working except the buttons. I’ve gone through the steps multiple times and watched the video but I can’t get the buttons to work. Clicking the slicer works to filter my graph, same for the bookmarks in the ‘bookmarks’ pane but if I hide the slicer and try to control the filtering by clicking the buttons it doesn’t work. I can’t figure out what I did wrong. Any suggestions?

      • Never mind my question from earlier. It was user error. Need to read the words on the screen in Power BI! Thanks for this tutorial, it was exactly what I needed!

  11. Hi, Is there a way we can implement this requirement with out using bookmarks ? Just curious and was looking at some alternate approaches ?

    PS: Not a big fan of bookmarks

    Thanks,
    Sri

    • The main idea was to show the button highlighting with a bookmark. The measure can be used with just a slicer.

      Bookmarks are incredibly powerful, however, you must use extreme caution. My advice is to never use the “All visuals” setting and always change to “selected visuals”. Bookmarks can do great things, but make sure you research and fully understand how they work if you do!

  12. Also, what if I have to show a percentage measure on the same visual. For ex. I want to show the dollar amount(as a whole number) and profit as a percentage.

    • The measure works best if there is the same data type. You can add the DAX function FORMAT – but this formats % as a text. Sometimes, I’ll create another measure with the format and display in the tooltip.

  13. Can we switch between different columns(for eg swapping legends) using buttons or bookmark in power bi.

    • Not easily in bookmarks. You can make multiple graphs, then use the bookmark to hide and unhide the correct ones

  14. Great solution! But how should I deal with the formating once I have a graph for money U$ and another for gallons. Once you have all in one measure , I had to unformat. And the DAX Formula for FORMAT didnt work inside selected value.

    • FORMAT – formats % as a text. Sometimes, I’ll create another measure with the format and display in the tooltip.

      You can always make multiple graphs, then use the bookmark to hide and unhide the correct ones

  15. Howdy very nice blog!! Man .. Excellent .. Superb ..
    I’ll bookmark your website and take the feeds also…I am glad to seek out a lot of useful info here in the put up, we need develop extra techniques on this regard, thank you for sharing.

  16. Hi. Great article. Thank you for putting it together.
    I am trying to add buttons to a table. Table lists metric names and their values. The button should be attached to each metric name, when pressing the button, user should be taken to page within the same report with more info about the metric.

    I created bookmarks for each of the tabs. I created buttons for those bookmarks.Buttons rest on each of the metrics in the table and by clicking the button, user is taken to a tab with more info about the metric.

    Big problem: if I scroll through the table or sort the table, buttons remain where they were. This leaves me with buttons in all the wrong place if user so much as scrolls down the table one inch.

    How do I attach buttons to particular cells of a table?

    Thanks beforehand for any suggestions.

  17. Hi,

    Can we also do this if we have a metric with % format and other with whole number format?

    • The measure works best if there is the same data type. You can add the DAX function FORMAT – but this formats % as a text. Sometimes, I’ll create another measure with the format and display in the tooltip.

  18. Hi guys,
    a big thanks to the job done here, I love it!
    Is it possible to do Something similar, but in order to switch the X-Axis of a chart?
    E.g.: I would like to be able to see my number of requests (chart’s values) according to the creation date or to the closing date.
    Is it possible?
    Cheers

    • The x-axis is harder to change, as this needs to be a defined column.
      My recommendation would be to create two separate visuals with each x-axis, then use a button to toggle between the two.

      This video describes these steps in more detail. They use a table and chart, but you could just as easily do it with two charts with different axis:
      https://www.youtube.com/watch?v=_Afcj8mT5_Q

  19. Absolutely brilliant stuff! very useful.
    In most of the cases, management wants viz to be dynamic and this is a great example and walkthrough!
    I do have a question though, can we implement the same for it to work on a waterfall chart? I tried creating the bar chart with bookmarks and changed it to a waterfall but the buttons do not work anymore.
    Cheers

    • You need to make sure the slicer is hidden when you record the bookmark. You can click on the eye next to the slicer in the selection pane to hide it.
      Also, you should make sure the slicer is selected when recording.
      Try redoing the bookmark with all the steps, and make sure this is hidden when recording.

  20. This has helped me A LOT, thank’s for some great content!
    One question: How would I go about if I wanted a fourth button “display all”, that shows Volume, Dollars and Margin in the same graph? Is it possible?

    • You could add 4 into the control table as “All”. Then make 3 measures, such as:

      Selected Calculation 1=
      SWITCH(
      SELECTEDVALUE(Control[Number_ID])
      ,1,SUM(Sales[Volume])
      ,4,SUM(Sales[Volume])
      , BLANK()
      )

      Selected Calculation 2=
      SWITCH(
      SELECTEDVALUE(Control[Number_ID])
      ,2,SUM(Sales[Dollars])
      ,4,SUM(Sales[Dollars])
      , BLANK()
      )

      Selected Calculation 3=
      SWITCH(
      SELECTEDVALUE(Control[Number_ID])
      ,3,Sum(Sales[Margin])
      ,4,Sum(Sales[Margin])
      , BLANK()
      )

      Then add all 3 into the values. If you select 4 it will display all, otherwise just the correct value

  21. This was a great post! Thank you! I ran into two issues. The first was a formatting issue which you’ve addressed above. This doesn’t work as well for data that needs to be formatted different (i.e. % vs whole numbers). The second issue is that I have to press control + click to select each button. Is there any way to get around the 2nd issue?

  22. Hi Steve – this is exactly what I was looking for, it works really well!

    I am using it to switch between 2 rather than 3 metrics. One is a monetary value and the other is a percentage. Is there a way of getting the percentages to show with the actual % after it?

    For example, it shows in the bar chart as 0.6 rather than 60%.

    Thanks again!

    Chris

    • The easy way is to wrap each calculation in the FORMAT function – but the problem with using the FORMAT function is that it changes everything to text.
      The better way is to use Tabular Editor and calculation groups – this is quite advanced but the best way to achieve this. See this article for a good explanation.

  23. Hi Steve,
    I’m trying to build a combination of this and the pure bookmark solution for different charts similar to how you linked to GIAC.

    I have 3 charts I want to show/hide, this works nicely just using the bookmarks, however I want to incorporate the table and ID column so I can format the colour of the buttons based on the selected value. The part I’m struggling with is capturing the data of the slicer with the display of the charts within a bookmark. It either doesn’t update the chart or it clears the data for all visuals.

    Any ideas? Ideally I could have a column in a matrix visual with the value of the switch statement supplying the desired field name rather than measure, but Power BI doesn’t seem to allow for a dynamic column.

    • Of course I figured this out after making the comment! Trick I was missing was the ability to ctrl+click select on objects within the selection panel, this made it much easier to select hidden visuals and make the bookmark only update selected visuals.

      Love this combination of bookmarks to control show/hide display properties, then config tables to store “state” that can be referenced within the data model and other visuals properties!

      • Another tip – group the visuals by selecting them all, then right click on them and group.

        This way the group is affected – you can add additional visuals (or remove) from the group, no need to re-record the bookmark!

  24. great guide .follow up question I ran into : is there to create nested measures , so the first measure separate between one category and each path in the switch leads to another measure with switch statement that separate a second category.
    firstMeasure = switch (col,1,anotherMeasure,2,…)

    • Yes, you could easily use a switch to select measures – a pretty neat trick!

  25. Having read this I believed it was really enlightening.
    I appreciate you finding the time and energy to put this short article together.
    I once again find myself personally spending way too much time both reading and leaving comments.
    But so what, it was still worthwhile!

1 Trackback / Pingback

  1. Power BI Paginated, DAX Fusion, Visuals and more... (August 12, 2019) | Guy in a Cube

Comments are closed.