Tag: Tutorials

  • Digging Deeper with R Visuals for PowerBI

    Digging Deeper with R Visuals for PowerBI

    Back by popular demand, we have another great tutorial on using R visuals.  There are a number of amazing visuals that have been supplied with the PowerBI desktop tool.  However, there are some limitations.  For example you can’t merge a scatter plot with a bar chart or with a area chart.  In some cases it may be applicable to display one graph with multiple plot types.  Now, to be fair Power BI desktop does supply you with a bar chart and line chart, Kudos Microsoft, #Winning…. but, I want more.

    This brings me to the need to learn R Visuals in PowerBI.  I’ve been interested in learning R and working on understanding how to leverage the drawing capabilities of R inside PowerBI.  Microsoft recently deployed the R Script Showcase, which has excellent examples of R scripts.  I took it upon myself to start learning.  Here is what I came up with.
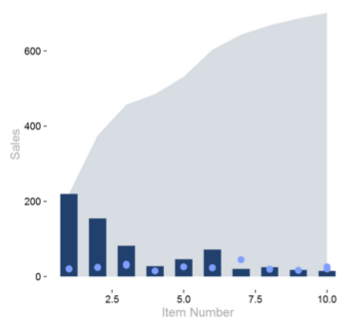
    R Plot in PowerBI Desktop
    R Plot in PowerBI Desktop

    This is an area plot in the background, a bar chart as a middle layer and dots for each bar.  The use case for this type of plot would be to plot sales by item number,  sales are in the dark blue bars, and the price is shown as the light blue dots.  The area behind the bars represent a running total of all sales for all items.  Thus, when you reach item number 10, the area represents 100% of all sales for all items listed.

    If you want to download my R visual script included in the sample pbix file you can do so here.

    Great, lets start the tutorial.

    First you will need to make sure you have installed R on your computer.  To see how to do this you can follow my earlier post about installing R from Microsoft Open R project.  Once you’ve installed R open up the R console and enter the following code to install the ggplot2 package.

    install.packages("ggplot2")
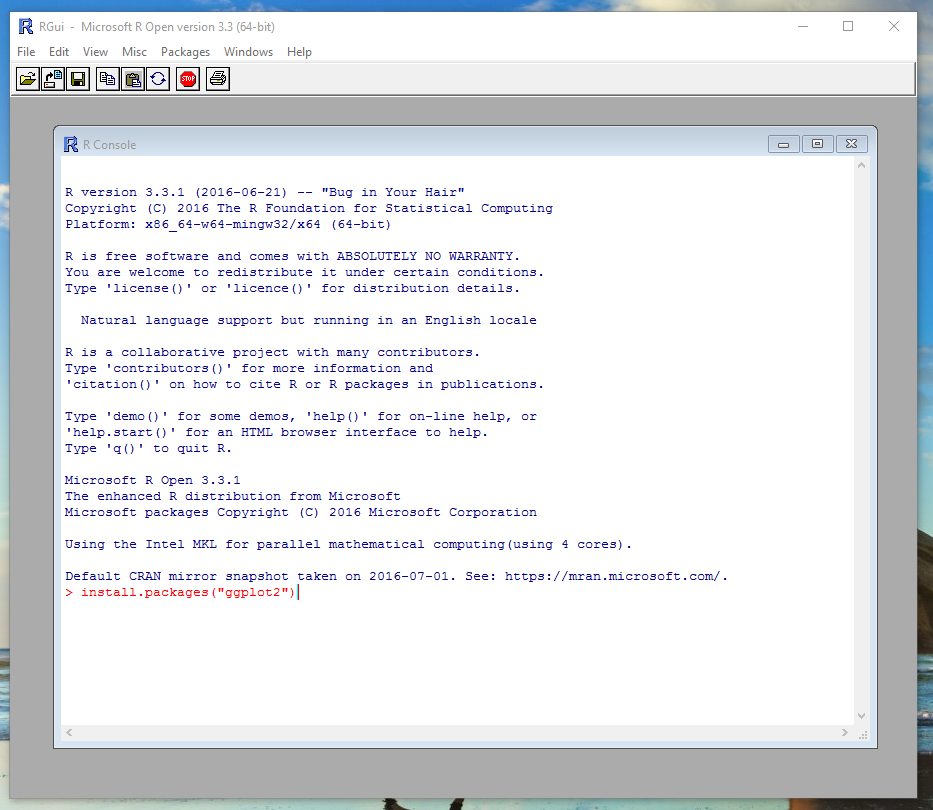
    Install ggplot2 Code
    Install ggplot2 Code

    Once complete you can close the R console and enter PowerBI Desktop.  First, we will acquire some data to work with.  Click on the Home ribbon and then  select Enter Data.  You will be presented with the Create Table dialog box.  Copy and paste the following table of information into the dialog box.

    Item Sales Price Customer
    1 100 20 Customer A
    2 75 25 Customer A
    3 20 30 Customer A
    4 18 15 Customer A
    5 34 26 Customer A
    6 12 23 Customer A
    7 20 22 Customer A
    8 15 19 Customer A
    9 10 17 Customer A
    10 8 26 Customer A
    1 120 21 Customer B
    2 80 24 Customer B
    3 62 33 Customer B
    4 10 15 Customer B
    5 12 26 Customer B
    6 60 24 Customer B
    7 20 23 Customer B
    8 10 20 Customer B
    9 8 16 Customer B
    10 7 20 Customer B

    Rename your table to be titled Data Sample.
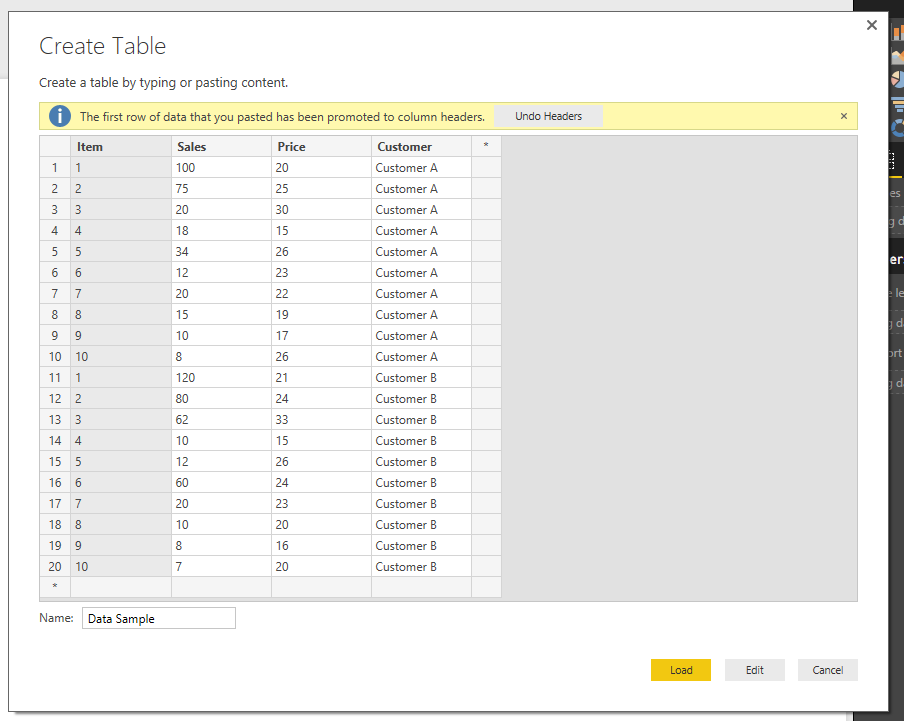
    datatable
    Data Sample Table

    Click Load to bring in the data into PowerBI.

    Next, we will need to create a cumulative calculated column measure using DAX.  On the home ribbon click the New Measure button and enter the following DAX expression.

    Cumulative = CALCULATE(  sum('Data Sample'[Sales] ) ,   FILTERS(  'Data Sample'[Customer] ) ,  FILTER( all( 'Data Sample' )  ,  'Data Sample'[Item] <= MAX( 'Data Sample'[Item] ) ) )

    This creates column value that adds all the sales of the items below the selected row.  For example if I’m calculating the cumulative total for item three, the sum() will add every item that is three and lower.

    Now, add the R visual by clicking on the R icon in the Visualizations window.

    Note: There will be an approval window that will require you to enable the R script visuals.  Click Enable to proceed.
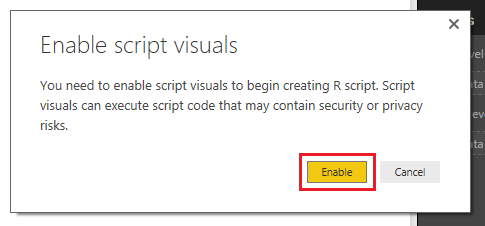
    Enable R Visuals
    Enable R Visuals

    While selecting the R visual add the following columns to the Values field in the Visualization window.
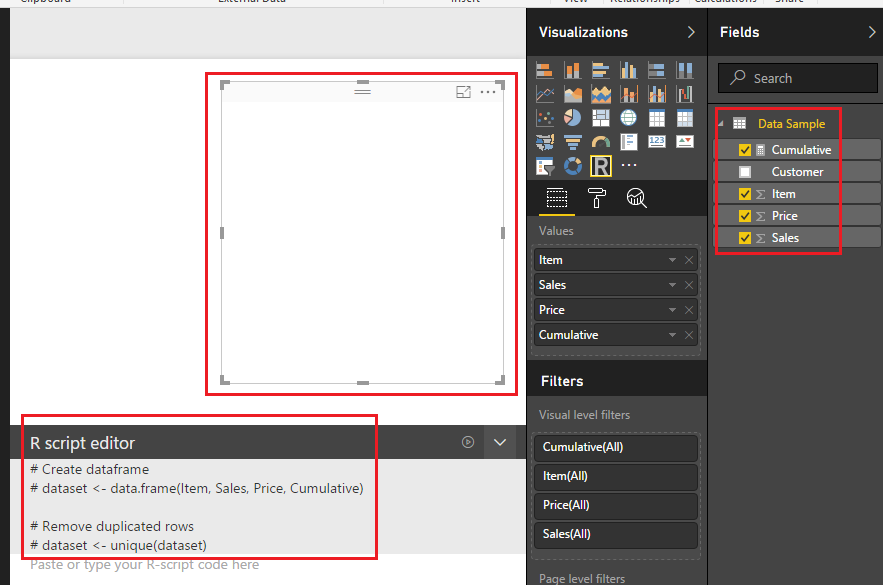
    Add Column Data
    Add Column Data

    Note: After you add the columns to the Values the R visual renders a blank image.  Additionally, there is automatic comments entered into the R Script Editor (the # sign is a designation that denotes a text phrase).

    Next, enter the following R code into the script editor.

    library(ggplot2)   # include this package to use Graphing functions below
    
    ggplot(dataset, aes(xmin=1, x=Item)) +    # Initialize ggplot function, define the x axis with Item data
     geom_ribbon(fill=c("#D7DDE2"),           # Set the color of the Area Plot,
     aes( ymin=0, ymax=Cumulative )) +        # Define the Y-Axis data
     geom_bar(fill=c("#21406D") ,             # Define the color of the Bars
     stat = "identity" ,      # Define the Statatics property of the bars - This is a required field
     width=.6 ,               # Change the bar width to 60% - 1 would be full bar width
     aes( x=Item, y=Sales )) +          # Define the X and Y axis for bars
     geom_point( color=c("#809FFF"),    # Define the color of the dots
     size=4,                  # Define the dot size
     aes( x=Item, y=Price )) +          # Define the X and Y axis values
     theme_classic(base_size=18) +      # Remove unwanted items from plot area such as grid lines and X and Y axis lines, Change font size to 18
     theme( axis.title.x = element_text(colour = "dark grey"),     # Define the X axis text color
     axis.title.y = element_text(colour = "dark grey")) +          # Define the Y axis text color
     labs( x="Item Number", y="Sales")                             # Define the labels of the X and Y Axis

    Press the execute R Script button which is located on the right side of the R Script Editor bar.
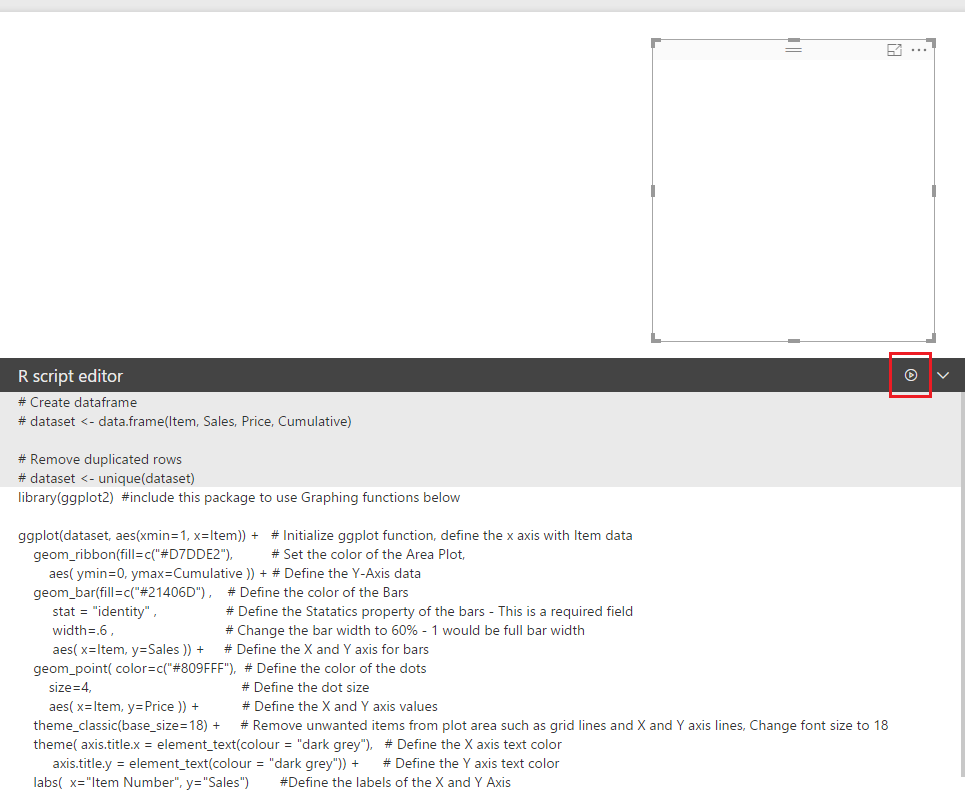
    Execute R Script Editor Button
    Execute R Script Editor Button

    The R Script will execute and the plot will be generated.
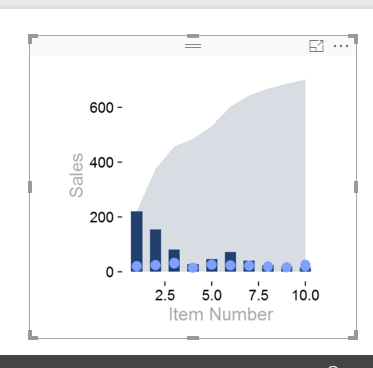
    R Plot Generation
    R Plot Generation


    Great, we have completed a R visual.  So what, why is this such a big deal.  Well, it is because the R Script will execute every time a filter is applied or changed.  Lets see it in action.

    Add a slicer with the Customer column.
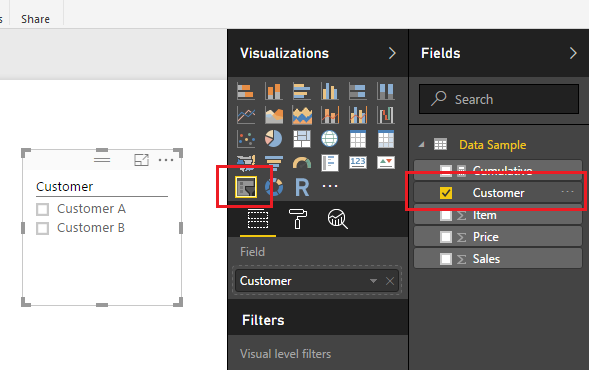
    Add Customer Slicer
    Add Customer Slicer

    Notice when you select the different customers, either A or B the R script Visual will change to reflect the selected customer.
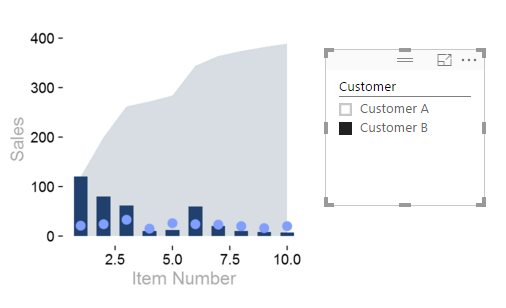
    Customer B Selected
    Customer B Selected

    Now you can write the R script code once and use the filtering that is native in PowerBI to quickly change the data frame supporting the R Visuals.

    As always, thanks for following along.  Don’t forget to share if you liked this tutorial.

    Want to learn more about PowerBI and Using DAX.  Check out this great book from Rob Collie talking the power of DAX.  The book covers topics applicable for both PowerBI and Power Pivot inside excel.  I’ve personally read it and Rob has a great way of interjecting some fun humor while teaching you the essentials of DAX.

  • Using R Visuals in Power BI

    Using R Visuals in Power BI

    For those of you who have been hanging around PowerBI for a while you have likely heard about integration with R visuals.   No, this isn’t a twisted dream where Power BI now ships with Pirates… Rather, this has been a highly untapped feature.

    In a brief summary R or as it is known on its site R Project for Statistical Computing, is a statistical open source software package that enables mathematicians, statisticians, or data scientists to quickly calculate complex analysis.  It is the tool of us super nerds.  Now R by it’s self isn’t super powerful, it’s the numerous packages that have been developed by people way smarter than me that can do very amazing functions.  Packages include functions for forecasting, math functions, statistic functions and best of all charting functions.  Well, this may be fine and dandy so what?  Well here is the best part.  Microsoft has chosen to integrate and support various releases of R into it’s tools.  For example R can now be leveraged within SQL server 2016, and now visuals built in R can be leveraged in Power BI Desktop and PowerBI.com.  R can also be used to transform and prepare data during a date set load.

    The important note here is that Microsoft has released it’s own open version of R.  This distribution is called MRAN, and can be found at this site.  The MRAN has been slightly tweaked from the R Project.  In the Microsoft version of R, (which I will refer to as MRAN) there has been stability fixes and the improved performance (added Multi threaded Performance).

    So enough back ground lets fire this thing up.

    First you will need to install the latest version of MRAN.

    Navigate to the following address https://mran.microsoft.com/ Click the Download button found  at the top middle of the page.

    mran-download-page
    mran download page

    Note: At the time of this Tutorial the current version of MRAN is 3.3.1, it is likely that this will change since Microsoft is constantly updating this site and releasing new stabilized & enhanced performance versions of R.

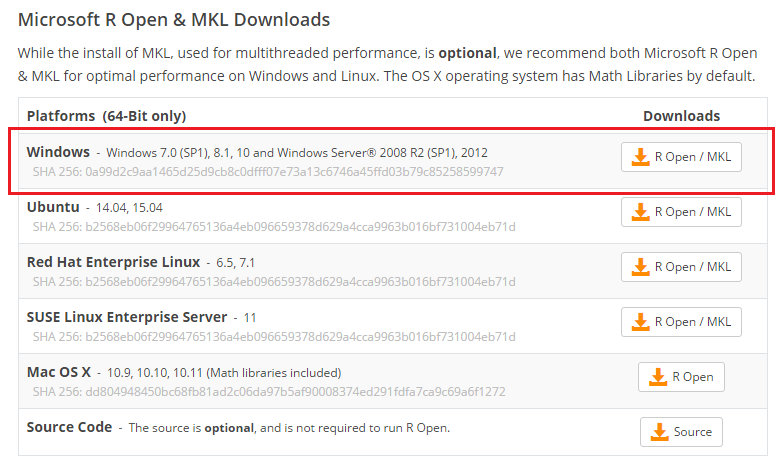
    Select the platform that you will be using to install MRAN on.  I’m using windows, thus I’ll be downloading and installing the top installation version.


    windows-platform-of-mran
    Windows Platform of MRAN

    Note: If you need additional installation help you can follow / read the documentation provided by Microsoft.  It can be found here.

    In order to keep this tutorial brief I will assume you know how to install software and have made it through the MRAN installation successfully.  Once installed you should have the following program installed in your start menu.

    Installation of R
    Installation of R

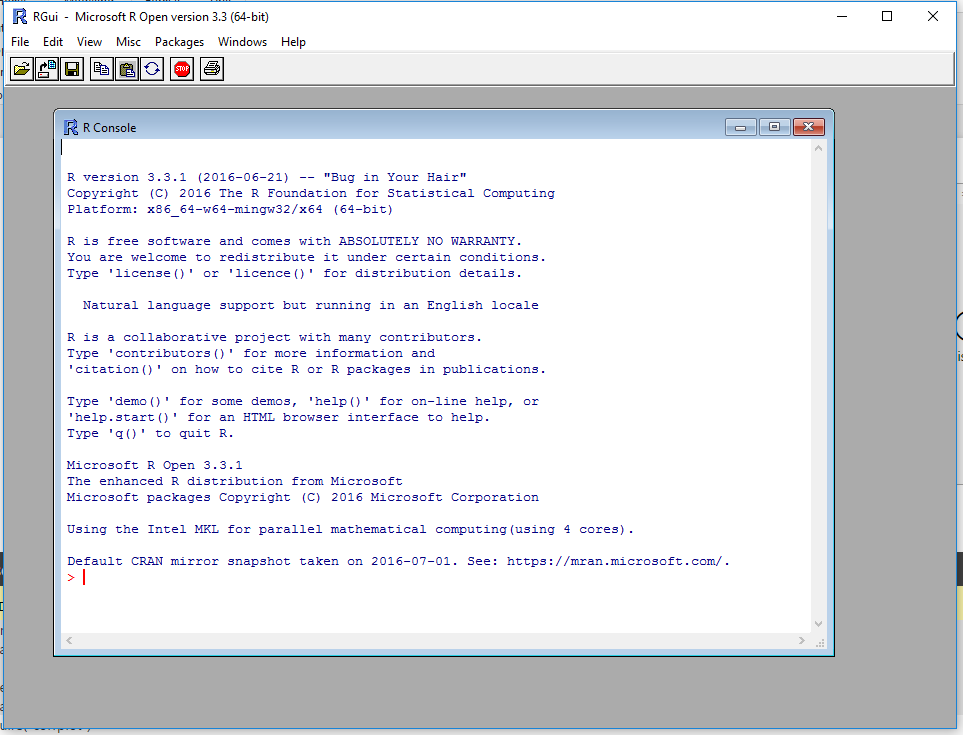
    Run the new installation of R.  The R installation will open up a console window.

    R Console
    R Console

    At the bottom of the console window is a red line where you enter commands.  Enter the following code and press enter.

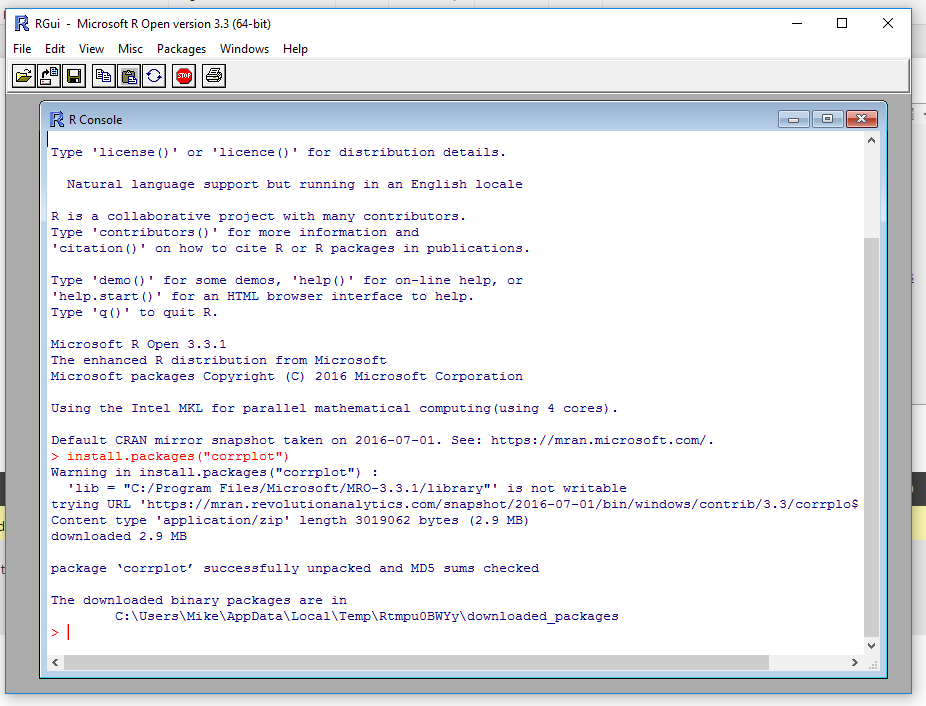
    install.packages(“corrplot”)

    This will install the proper R package that we will use later in PowerBI.  After running this line of code the console will download the correct package and install it on your computer.

    Install corrplot Function
    Install corrplot Function

    At this time you can close the R console program.

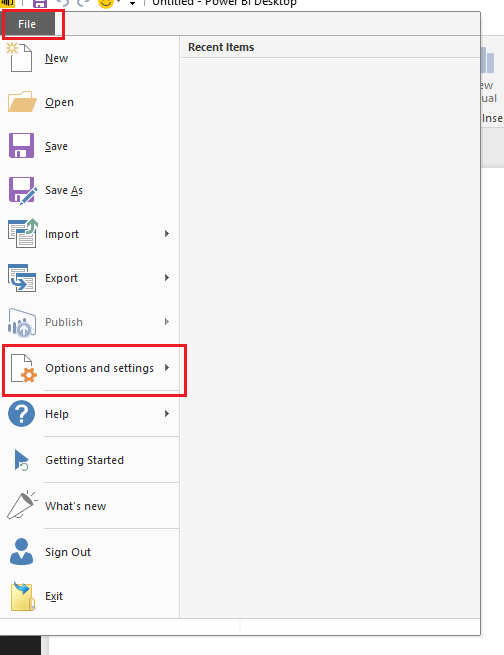
    Now, open up PowerBI Desktop.  Once in PowerBI desktop click on the File Button at the top left hand part of the screen.  Next, Click Options and Settings.

    Powerbi Options and Settings
    PowerBI Options and Settings

    Then click on the Options button.

    Options Button
    Options Button

    Under the Global options menu on the left verify that your new installation of MRAN is listed.  PowerBI should automatically detect the installation and show the installation with the current version number in the home directory:

    R Home Directory
    R Home Directory

    Seeing the listed installation in the Home Directory verifies that R has been properly installed on your computer. Clicking OK will close the window.

    Data Time!!  Below is the M Language that can be used in your Query Editor.  Copy the code below and enter it into the Advanced Editor found in the Query Editor.

    let
     Source = Excel.Workbook(Web.Contents("https://powerbitips03.blob.core.windows.net/blobpowerbitips03/wp-content/uploads/2016/09/CarDetails.xlsx"), null, true),
     CarData_Table = Source{[Item="CarData",Kind="Table"]}[Data],
     #"Changed Type" = Table.TransformColumnTypes(CarData_Table,{{"Year", Int64.Type}, {"Make", type text}, {"Model", type text}, {"Liters", type number}, {"Hp", Int64.Type}, {"Cylinders", Int64.Type}, {"MPG City", Int64.Type}, {"MPG Hwy", Int64.Type}})
    in
     #"Changed Type"

    Note: If you want to learn how to enter M language code into the Query Editor follow this Tutorial.

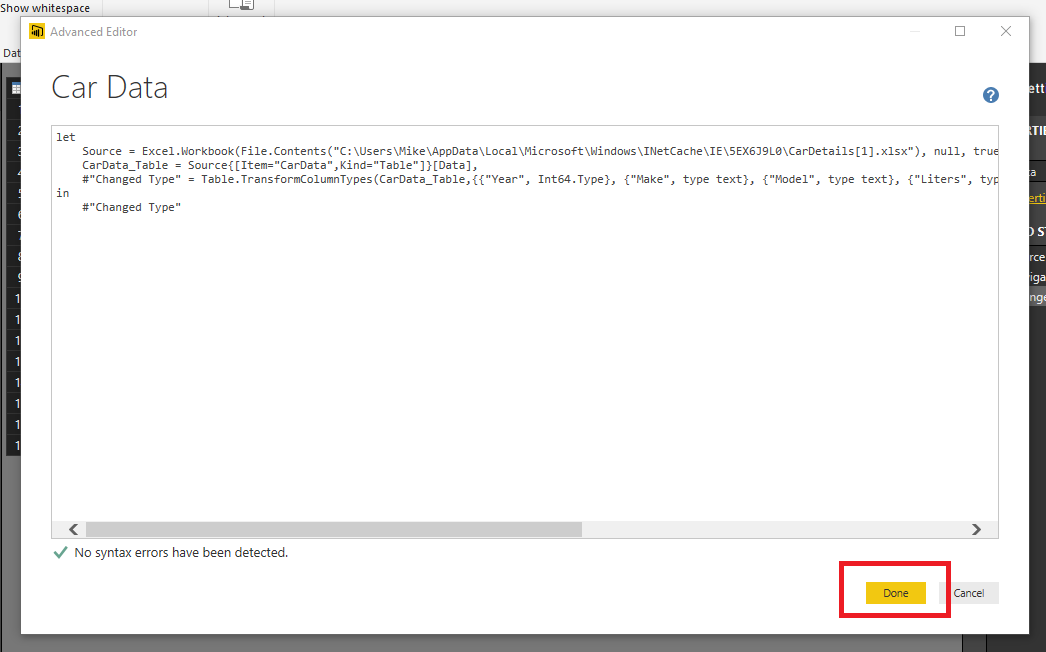
    Once you have pasted the code above into the Query Editor it should look like the following:

    Advanced Editor
    Advanced Editor

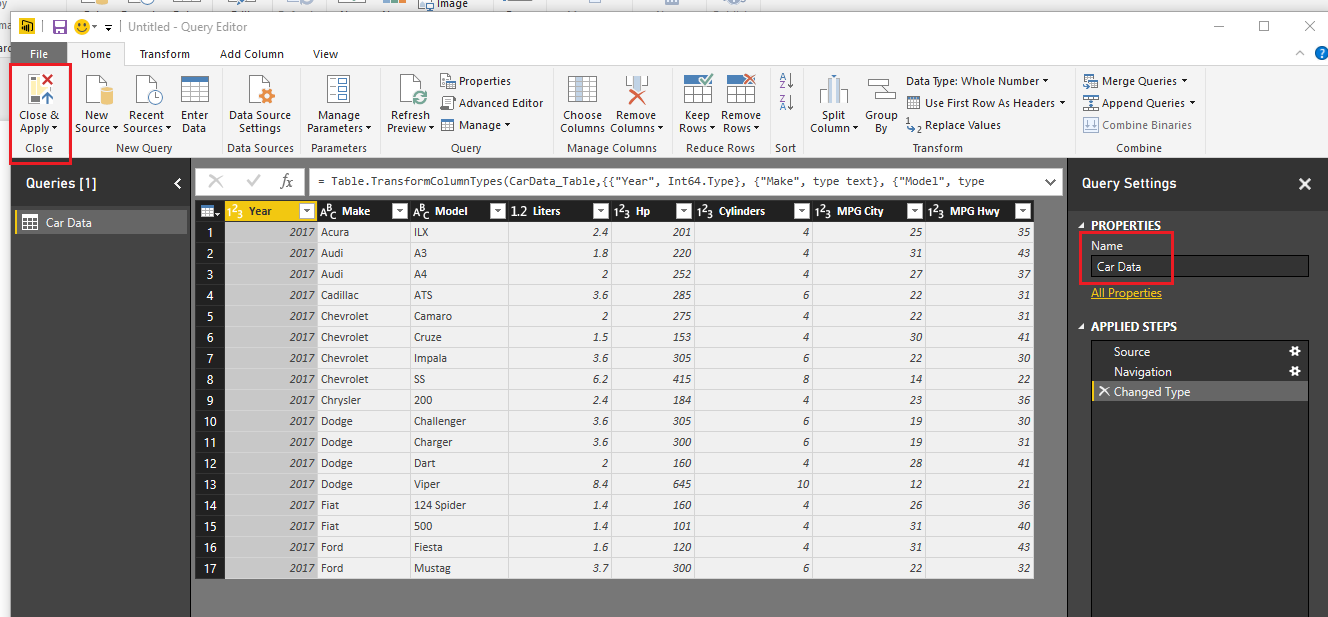
    Clicking Done will close the Advanced Editor and you will have data loaded into the Query Editor.  You must have an internet connection to connect to this data.  Rename your query to Car Data.  Then on the Home ribbon click Close & Apply to load the data into the data model.

    Car Data in Query Editor
    Car Data in Query Editor

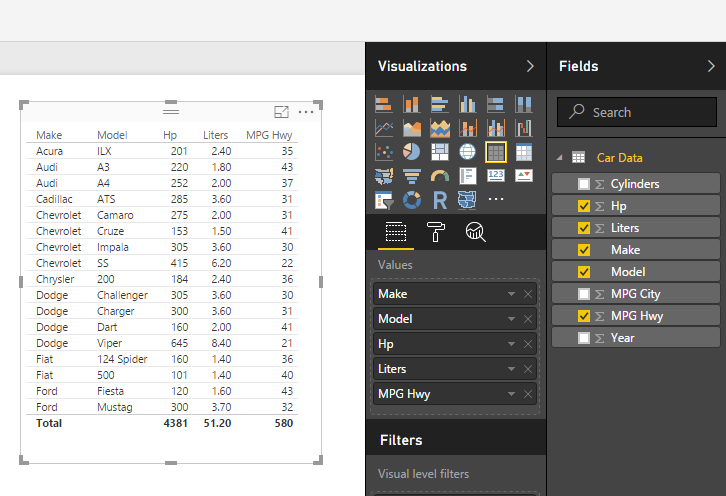
    Generate a simple table visual to see our data in table form:

    Table Visual
    Table Visual

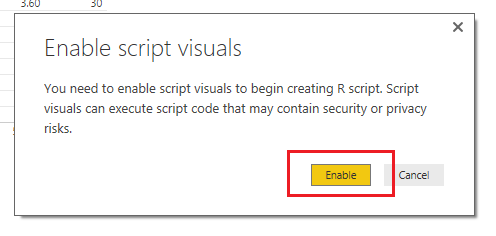
    Add an R visual by clicking the R inside the Visualizations bar.  When you click on the R visual you will see a pop-up, click Enable to proceed.

    Enable R Visuals
    Enable R Visuals

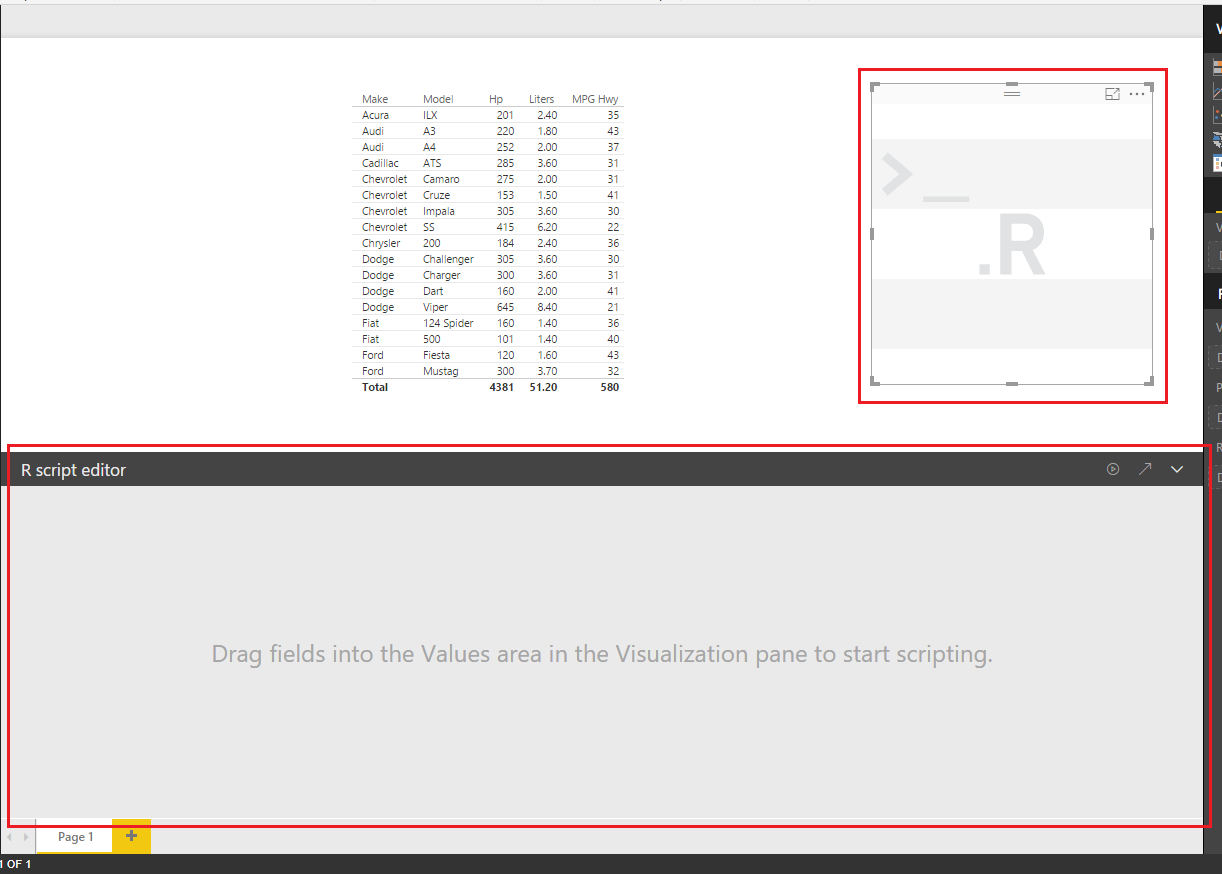
    Doing this will open up a visual pane on the page and reveal an R script editor at the bottom of the page window.

    R Script Editor
    R Script Editor

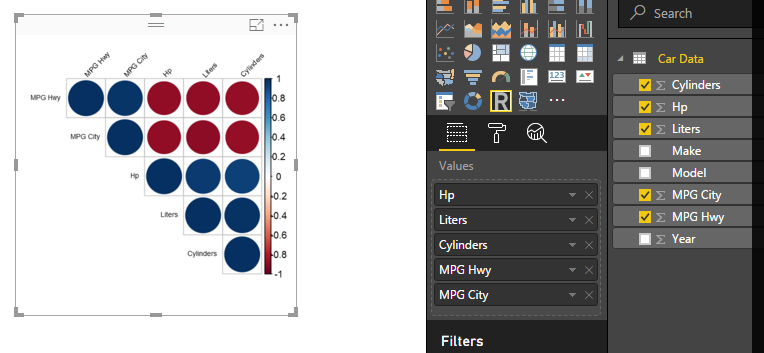
    While keeping the R visual selected add the following fields to the visual under the Values field:

    Add Columns to R Visual
    Add Columns to R Visual

    After adding these fields the R Script Editor will update and reveal code which informs you that your data from the selected columns will be added to a dataset.

    R Code Script Editor
    R Code Script Editor

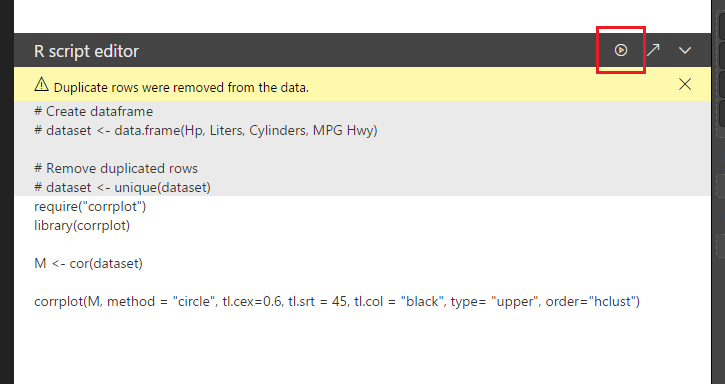
    Next add the following code into the white area below the #dataset <- unique(dataset) statement.

    require(“corrplot”)
    library(corrplot)

    M <- cor(dataset)

    corrplot(M, method = “circle”, tl.cex=0.6, tl.srt = 45, tl.col = “black”, type= “upper”, order=”hclust”)

    This loads a package called corrplot which allows you to apply a graph that has a correlation plot between metrics.  The M <- cor(dataset), takes your data runs a function called cor and then saves the results into a new variable called M.

    Next click the Play button icon found on the right of the grey bar on the R Script Editor.

    Running the R Script
    Running the R Script

    Success! You have completed a correlation plot using R within PowerBI.  Nice job.

    Final Plot
    Final Plot

    Bonus:

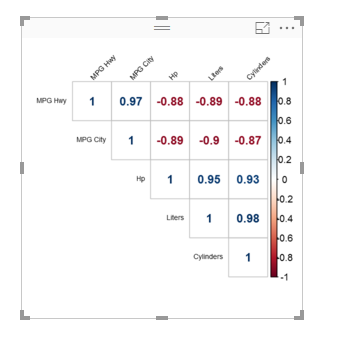
    If you want to get fancy with this correlation plot you can change the circles to the actual correlation values.  Change the last line of the R Script Editor code to the following and press the run script button:

    corrplot(M, method = “number”, tl.cex=0.6, tl.srt = 45, tl.col = “black”, type= “upper”, order=”hclust”)

    This removes the circles and then populates the correlation plot with numerical values representing the correlation between the various data features.

    Correlation Numbers
    Correlation Numbers

    The blue numbers represent values that have a positive correlation, while the red numbers represent a negative correlation.  In practical terms the higher the Horsepower  (HP) of the vehicle the lower the Miles per Gallon (MPG) that are realized.


  • Building Date Table from Scratch

    Building Date Table from Scratch

    Recently at work I’ve been working with a number of large data warehouses with time series data.  Often when working on such data you need to incorporate a data calendar to compute date ranges.  So, for this tutorial we will build a custom date table directly inside PowerBI.

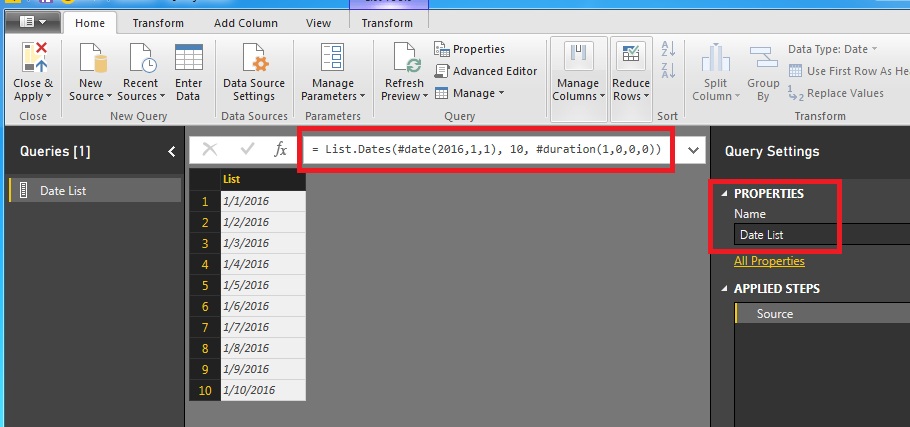
    Start by opening up power BI and clicking Get Data on the home ribbon, then select Blank Query.  Like always make sure you start by re-naming the query into something meaningful.  Change the name of the Query to Date List.  Next enter the following equation into the formula bar:

    List.Dates( #date(2016,1,1), 10, #duration(1,0,0,0))

    Note:  For more information on the M language you can visit here.  Also, here is the link to the List.Dates function found here.

    Once we enter the formula into the formula bar the list of dates will appear below.

    Date List
    Date List

    The quick explanation about the List.Dates function is below.  I’ve simplified the variables below:

    List.Dates(  Start Date  ,   Number of intervals   ,  Type of interval  )

    While this is interesting it does not help us make a report that updates the date range dynamically.  The real world use case for this would be you have a report with data that is being generated daily, say for example a website.  Maybe you want a custom date range that automatically changes every day you log into PowerBI.  For example if today is 08-20-2016, I want the first date to be today and then list the dates that previous 10 days.

    Now change the formula to the following formula:

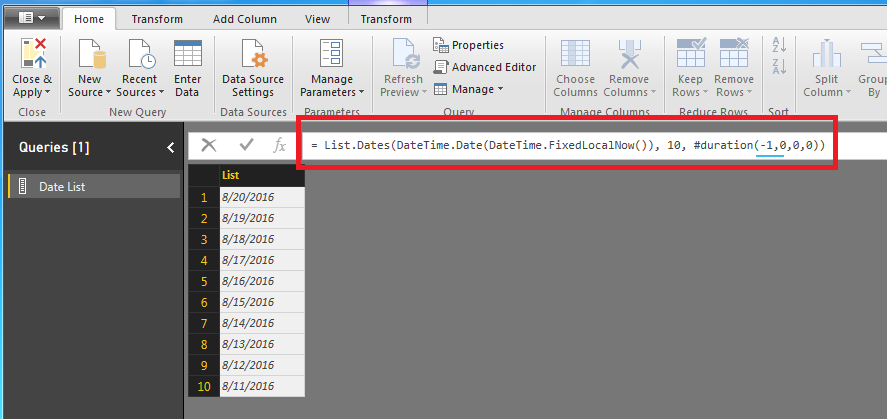
    = List.Dates(  DateTime.Date(  DateTime.FixedLocalNow() ) ,  10 ,  #duration(-1,0,0,0)  )

    Note:  In this equation we have changed the duration to -1.  This is important to note because now our date table returns older dates.  In our previous equation we used a positive 1 and we return future dates.

    In this new equation we have defined the Start Date to the following statement : DateTime.Date(  DateTime.FixedLocalNow() )  This is tricky because if you only use DateTime.FixedLocalNow() the statement will error out.  The error occurs because the DateTime.FixedLoaclNow() is a date and time.  The List.Dates function is expecting a Date only value.  Hence why we use the DateTime.Date() function to remove the time stamp and only return today’s date.

    Date List Using Date of Today
    Date List Using Date of Today

    It is most likely your date ranges will be different than the ones in the example because the DateTime.FixedLocalNow() function will be pulling in your computer’s current date.

    Next modify the equation to now pull the last 90 days (highlighted in red below)

    List.Dates(DateTime.Date(DateTime.FixedLocalNow()), 90, #duration(-1,0,0,0))

    The list of dates is just that a list.  We really can’t do to many other enhancements to our data with only a list of dates.  Now transform the list into a table.  Click on the Transform ribbon and select To Table.  Notice now that we have a new column and a new applied step.

    New Column
    New Column

    The code for the new applied steps is as follows:

    Table.FromList(Source , Splitter.SplitByNothing() , null , null , ExtraValues.Error)

    I colored the first null in the equation.  This is actually a parameter that you can use to name the new column we just made.  Tricky, Tricky, PowerBI.  Modify the equation to the following:

    Table.FromList(Source , Splitter.SplitByNothing() , {"Date"} , null, ExtraValues.Error)

    Our table is updated and now has the name Date.  Nice work!

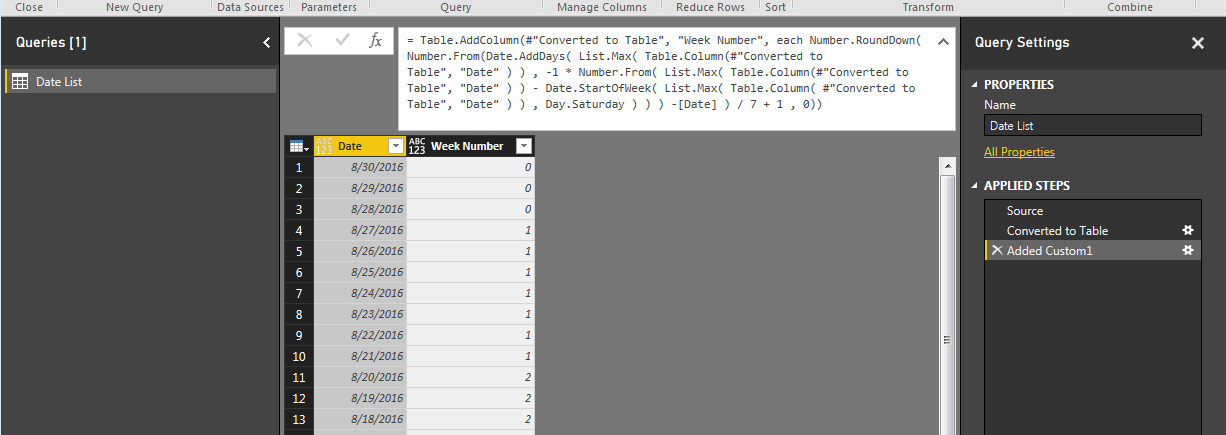
    Now lets make our date list useful.  Click on the ribbon labeled Add Column and then the button labeled Add Custom Column.  Add the following equation to the new column and name it Week #, then click OK, to continue.

    Number.RoundDown( Number.From(Date.AddDays( List.Max( Table.Column(#"Converted to Table", "Date" ) ) , -1 * Number.From( List.Max( Table.Column(#"Converted to Table", "Date" ) ) - Date.StartOfWeek( List.Max( Table.Column( #"Converted to Table", "Date" ) ) , Day.Saturday ) ) ) -[Date] ) / 7 + 1 , 0)

    This equation defines the start of the week highlighted in RED.  Since today is Tuesday 8/30/16, then the days 8/30 (Tues), 8/29 (Mon), 8/27 (Sunday) are considered week 0 or the current week.  All dates prior will start with weekly increment.

    Date List
    Date List

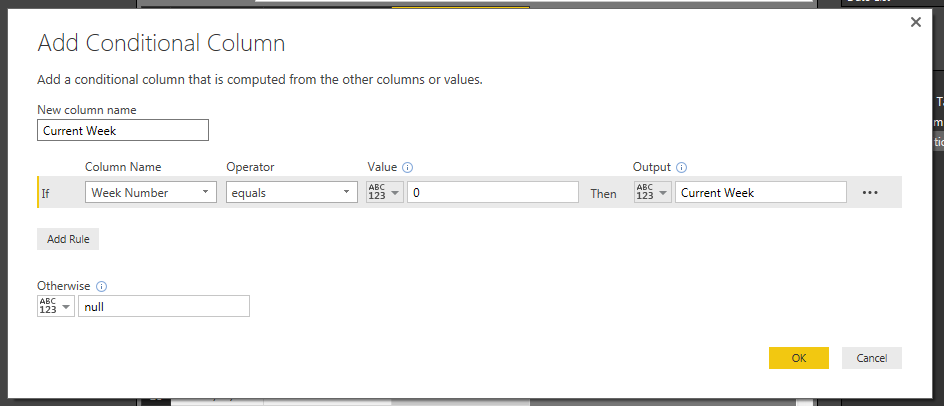
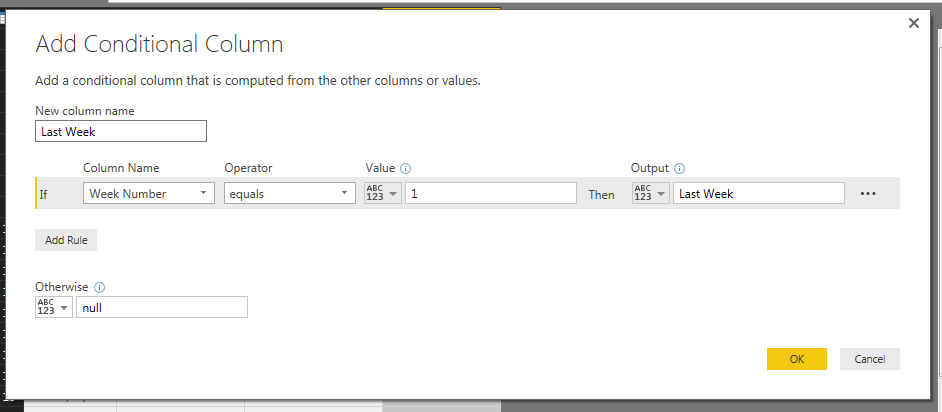
    Now we can add some logic to define week variables.  Click on the Add Column ribbon and select the Conditional Column button.  Using the drop downs in Column Name, Operator, Value and Output enter the following:

    Current Week Logic
    Current Week Logic

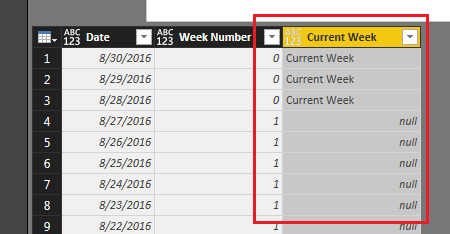
    Click OK to proceed.  We have now added an additional column with a text description of the week.

    Current Week Column
    Current Week Column

    Following the add column steps mentioned above we will now add more week descriptions.  Add the following conditional column for Last Week:

    Last Week Logic
    Last Week Logic

    From here you can make custom columns for how you want to describe your data.  In this example we will build last 2 weeks, 3 weeks and last 4 weeks.  See the add conditional column logic for each of those respective weeks.

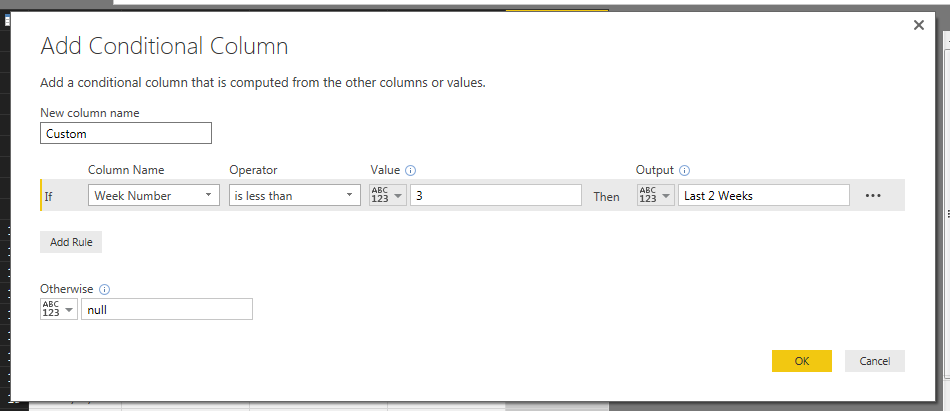
    Conditional Column Logic for last 2 weeks:

    Last 2 Weeks Logic
    Last 2 Weeks Logic

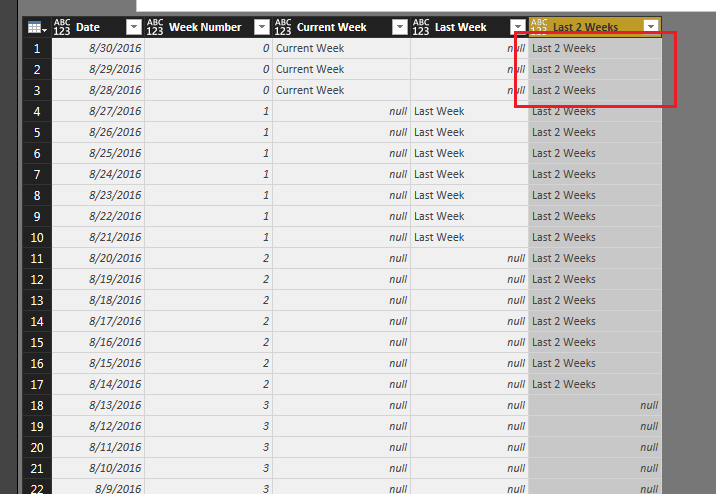
    Note: When we added this conditional column we label week 0 as last 2 weeks.  See image below as an example:

    Last 2 Weeks Column
    Last 2 Weeks Column

    To fix this we modify the code that generated this column.  The code initially states the following:

    = Table.AddColumn(#"Added Conditional Column1", "Last 2 Weeks", each if [Week Number] < 3 then "Last 2 Weeks" else null )

    We modify this code to the following: (changes highlighted in bold)

    = Table.AddColumn(#"Added Conditional Column1", "Last 2 Weeks", each if [Week Number] < 3 and [Week Number] > 0 then "Last 2 Weeks" else null )

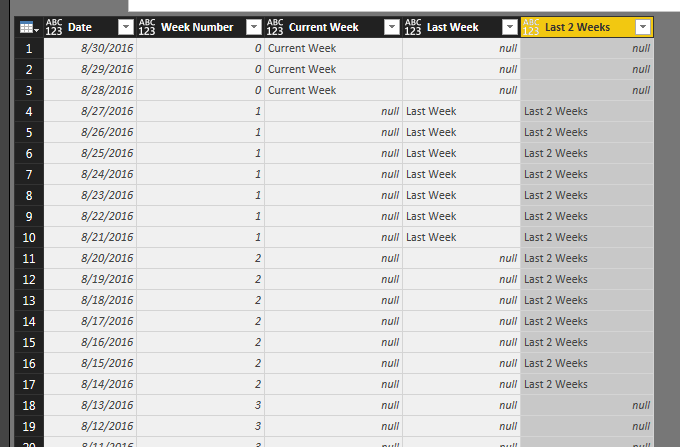
    This now removes the first three days from our Last 2 Weeks column reflecting a more accurate picture of our time ranges.

    Corrected Last 2 Weeks Column
    Corrected Last 2 Weeks Column

    Next we will add the Last 3 Weeks column and the Last 4 weeks column.  Each time we will modify the add column code to remove the first three dates of the current week.

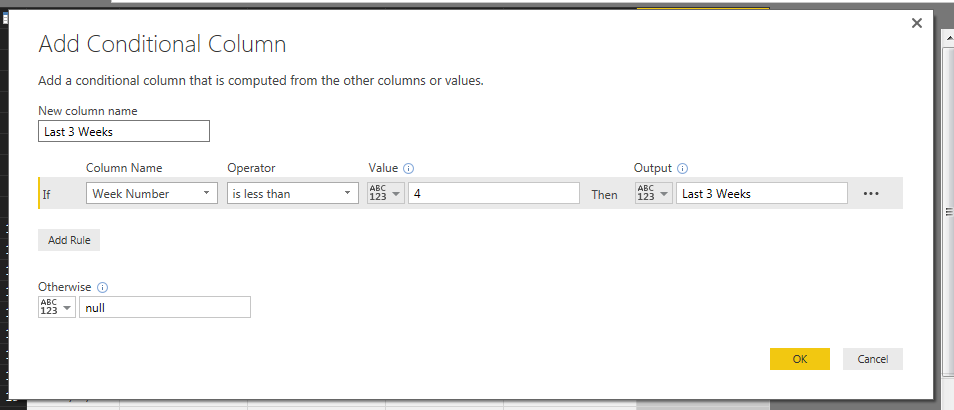
    Last 3 Weeks Logic
    Last 3 Weeks Logic

    Last 3 Weeks auto generated code:

    = Table.AddColumn(#"Added Conditional Column2", "Last 3 Weeks", each if [Week Number] < 4 then "Last 3 Weeks" else null )

    We modify to the following to achieve the correct Last 3 Weeks data range: (changes highlighted in bold)

    = Table.AddColumn(#"Added Conditional Column2", "Last 3 Weeks", each if [Week Number] < 4 and [Week Number] > 0 then "Last 3 Weeks" else null )

    Add the Last 4 Weeks column:

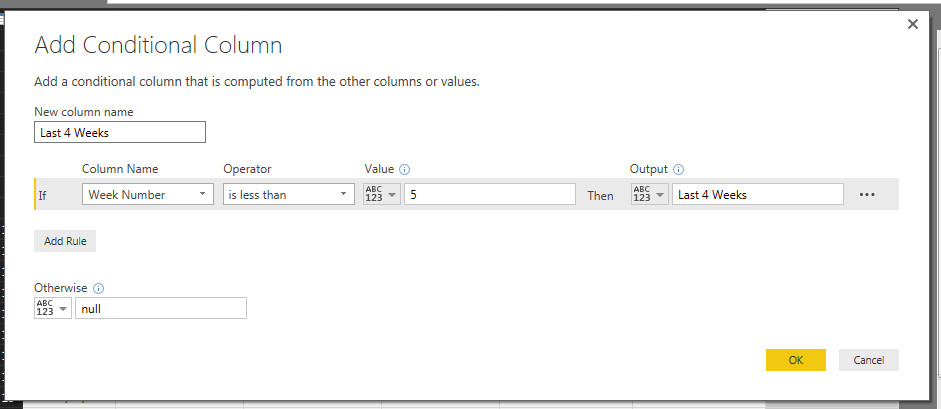
    Last 4 Weeks Logic
    Last 4 Weeks Logic

    Last 4 Weeks auto generated code:

    = Table.AddColumn(#"Added Conditional Column3", "Last 4 Weeks", each if [Week Number] < 5 then "Last 4 Weeks" else null )

    Modify the code the following to correct the column: (changes highlighted in bold)

    = Table.AddColumn(#"Added Conditional Column3", "Last 4 Weeks", each if [Week Number] < 5 and [Week Number] > 0 then "Last 4 Weeks" else null )

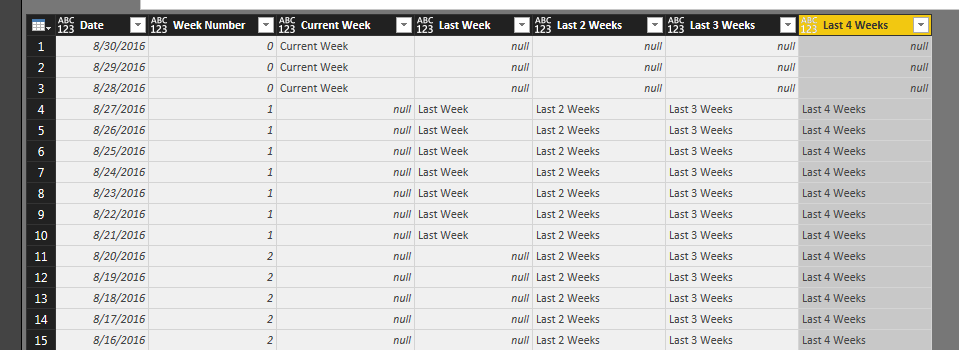
    Nice job so far.  We are almost to the end now.  After all those additional columns you should have something that looks similar to the following:

    Date Table
    Date Table

    Next we will pivot all the data down to one column.  This will enable us to select a time period and automatically have our date table update to the specific range.

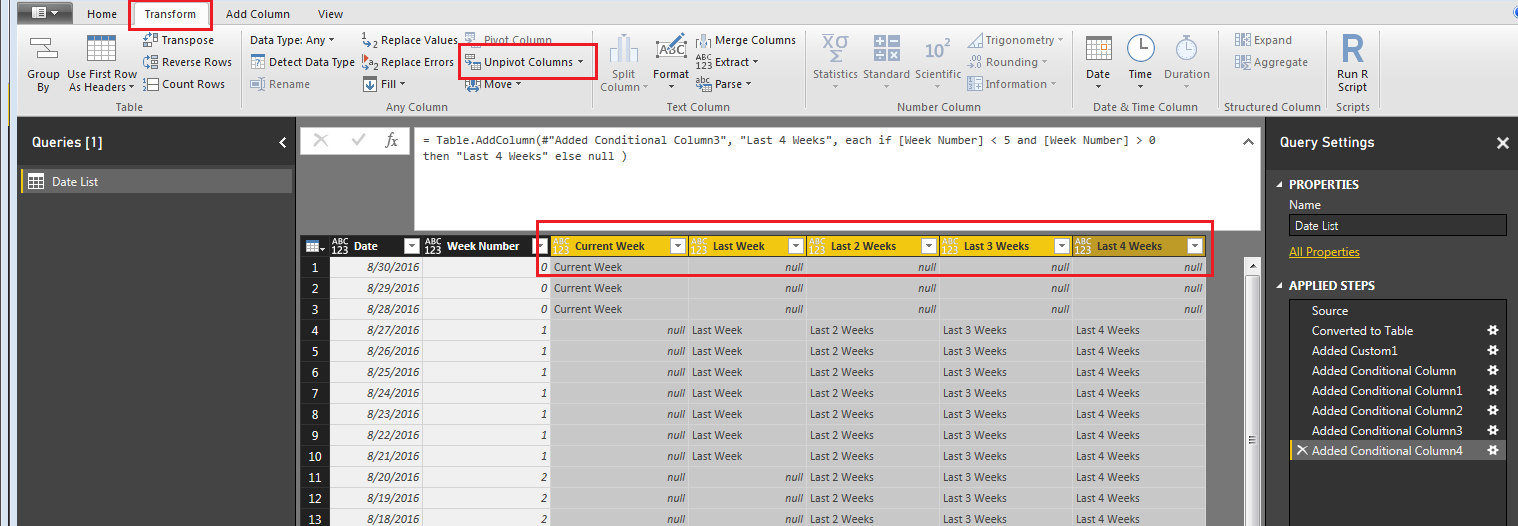
    First, shift select the following columns, Current Week, Last Week, Last 2 Weeks, Last 3 Weeks, and Last 4 Weeks.  Then on the Transform ribbon click the Unpivot Columns button.

    Unpivot Columns Command
    Unpivot Columns Command

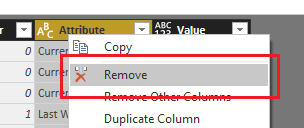
    Next delete the Attribute column using a right click on the Attribute column and selecting Remove Columns.

    Remove Attribute Column
    Remove Attribute Column

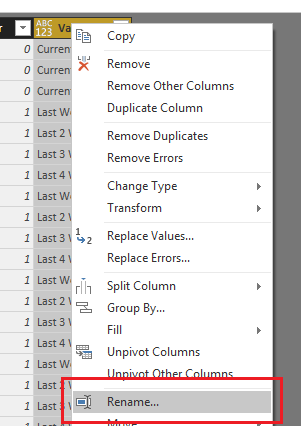
    Rename the Value column to Selector by right clicking on the Value column.

    Rename the Value Column
    Rename the Value Column

    Modify each column to have the correct Data Type on the Home ribbon.

    Date column data type should be Date

    Week Number column data type should be Whole Number

    Selector column data type should be Text

    Note: It is important to always check your data types for each column before you leave the Query Editor.  If you don’t you’ll find that the visuals that your trying to build later on on the page view will not work as expected.

    Next, click the Home ribbon and select Close & Apply.  You can now build the following visuals:

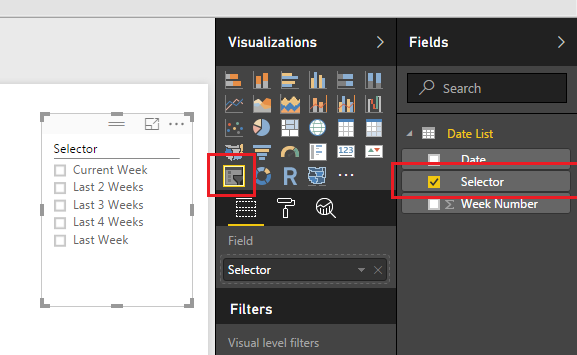
    A slicer for the Selector column:

    Selector Column as a Slicer
    Selector Column as a Slicer

    Table visual for the Date column:

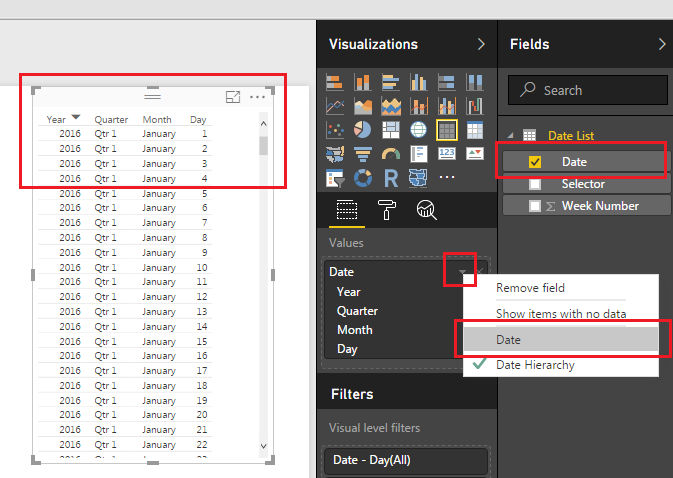
    Note: When you use the Date Column as the data source for the Table Visual the data will automatically be added as a Date Hierachy.  This does not work well with our data so you will need to change the date from a Date Hierarchy to a standard Date.  To do this click the little triangle next to the Date in the Values box.  Then select Date.

    Date Table
    Date Table

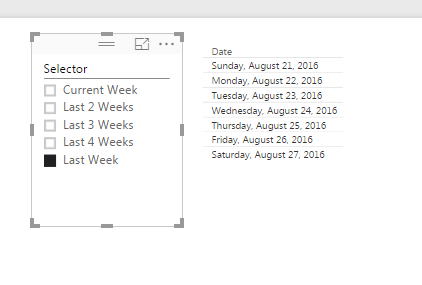
    Now you can finally play around with your data and by selecting different items in the Selector slicer you can filter down to different date ranges.  Below I selected the Last Week item, which filters down my dates to only the 7 days from last week.

    Last Week Slicer Selected
    Last Week Slicer Selected

    Nice job making a custom date table in PowerBI.  The nice part about this table is that it will always refresh with the latest dates whenever the queries are refreshed for this PowerBI file.

    Bonus:  For those of you who want to cheat and just have the M code to generate this custom date table it can be used from here:

    let
     Source = List.Dates(DateTime.Date(DateTime.FixedLocalNow()), 90, #duration(-1,0,0,0)),
     #"Converted to Table" = Table.FromList(Source, Splitter.SplitByNothing(), {"Date"}, null, ExtraValues.Error),
     #"Added Custom1" = Table.AddColumn(#"Converted to Table", "Week Number", each Number.RoundDown( Number.From(Date.AddDays( List.Max( Table.Column(#"Converted to Table", "Date" ) ) , -1 * Number.From( List.Max( Table.Column(#"Converted to Table", "Date" ) ) - Date.StartOfWeek( List.Max( Table.Column( #"Converted to Table", "Date" ) ) , Day.Saturday ) ) ) -[Date] ) / 7 + 1 , 0)),
     #"Added Conditional Column" = Table.AddColumn(#"Added Custom1", "Current Week ", each if [Week Number] = 0 then "Current Week" else null ),
     #"Added Conditional Column1" = Table.AddColumn(#"Added Conditional Column", "Last Week", each if [Week Number] = 1 then "Last Week" else null ),
     #"Added Conditional Column2" = Table.AddColumn(#"Added Conditional Column1", "Last 2 Weeks", each if [Week Number] < 3 and [Week Number] > 0 then "Last 2 Weeks" else null ),
     #"Added Conditional Column3" = Table.AddColumn(#"Added Conditional Column2", "Last 3 Weeks", each if [Week Number] < 4 and [Week Number] >0 then "Last 3 Weeks" else null ),
     #"Added Conditional Column4" = Table.AddColumn(#"Added Conditional Column3", "Last 4 Weeks", each if [Week Number] < 5 and [Week Number] > 0 then "Last 4 Weeks" else null ),
     #"Unpivoted Columns" = Table.UnpivotOtherColumns(#"Added Conditional Column4", {"Date", "Week Number"}, "Attribute", "Value"),
     #"Removed Columns" = Table.RemoveColumns(#"Unpivoted Columns",{"Attribute"}),
     #"Renamed Columns" = Table.RenameColumns(#"Removed Columns",{{"Value", "Selector"}}),
     #"Changed Type" = Table.TransformColumnTypes(#"Renamed Columns",{{"Date", type date}, {"Week Number", Int64.Type}, {"Selector", type text}})
    in
     #"Changed Type"
  • Using Variables for File Locations

    Using Variables for File Locations

    This week I encountered an issue when working with multiple queries in my data model.  Here is the source files in case you want to follow along.

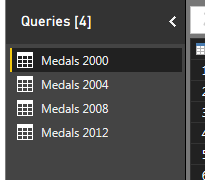
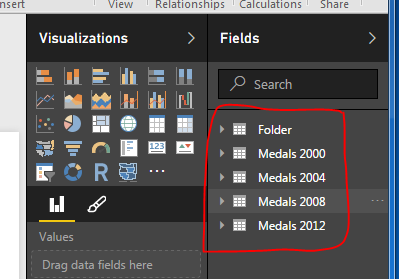
    Here’s what happened.  I had a PBIX file that had four queries in it, one file for the summer the Olympic metal count for the following years, 2000, 2004, 2008, and 2012.


    Olympic Metal Count
    Olympic Metal Count

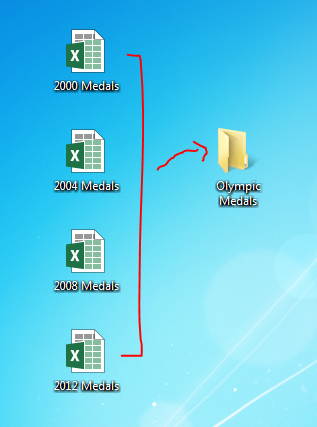
    After a bit of working I figured that my desktop screen was going to get to cluttered if I continued to collect Olympic metal data.  Thus, I moved my excel files which were my source data into a folder called Olympic Medals.

    File Move
    File Move

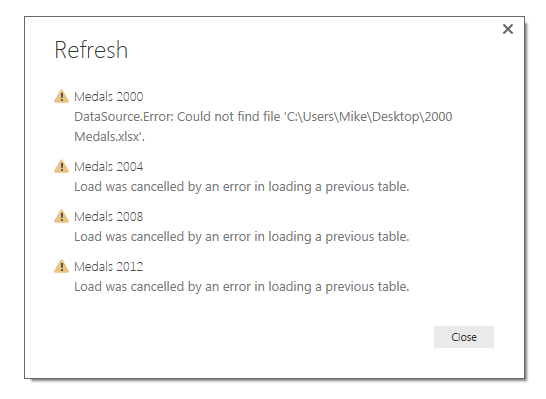
    By doing this I broke all the links for all four files.  This was discovered when I tried to refresh my queries and noticed that all the queries failed. Power BI gave me a nice little message notifying me that there was a data source error.

    DataSource.Error: Could not fine the file:
    Missing File Error
    Missing File Error

    To fix this I had to open the query editor and change each file’s location to the new folder that I just made.  Seeing that this is not an efficient use of my time, I decided to spend more time to figure out a way to make a variable that would be my file location for all my queries.

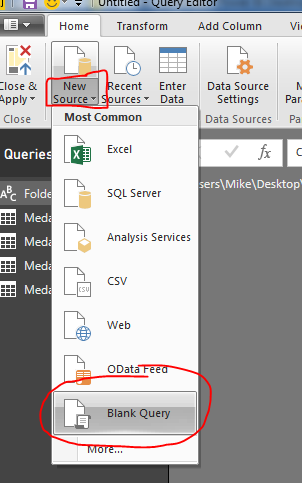
    Lets begin by making a new blank query by clicking on the bottom half of the New Source button on the Home ribbon.  Then click the item labeled Blank Query.

    Start Blank Query
    Start Blank Query

    With the new query open type in the file location where you will obtain all your working files.  For me my file location was on my desktop, thus the file location is listed below.  Rename the new query to Folder.

    Folder Query
    Folder Query

    Note: Since we are working on building a file structure for Power BI to load the excel files you will want to be extra careful to add a “\” back slash at the end of the file location.

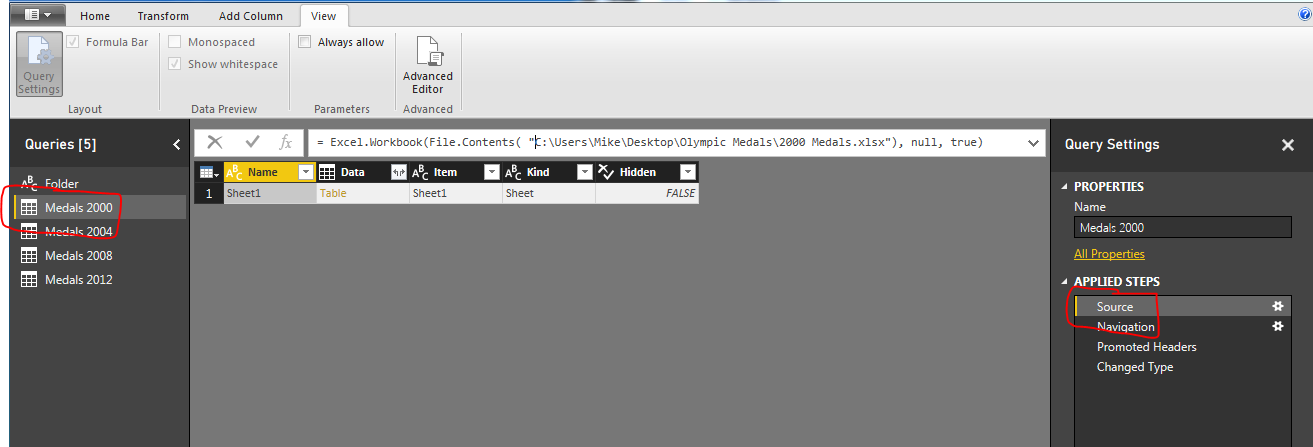
    Next on the query for Medals 2000, we click the Source under the applied steps window on the right.  This will expose the code in the formula bar at the top of the window.

    Select the Source Applied Step
    Select the Source Applied Step

    Note: If you don’t see the formula bar as I have illustrated in the image above, you can turn this feature on by click the View ribbon and checking the box next to the words Formula Bar.  This will expose the formula bar so you can edit the source step.

    This is where the magic happens.  We can now insert our new blank query into this step.  Our current file contents looks like the following:

    = Excel.Workbook(  File.Contents(  "C:\Users\Mike\Desktop\Olympic Medals\2000 Medals.xlsx") ,  null ,  true )

    Now remove the first part of the file location and make the equation match the following:

    = Excel.Workbook(  File.Contents(   Folder  &   "2000 Medals.xlsx") ,   null , true )

    Not only does this shorten our equation, it now uses the folder location we identified earlier and then we can pick up the file name 2000 Medals.xlsx.  This makes is very easy to add additional queries with the same steps.  Also, if you move your files to a new folder location, you only have to change the Folder query to reflect the new file location.  To test this make a new folder on your desktop called New Folder.  Move all the Olympic medal files to the new folder.  Now in Power BI Desktop press the Refresh on the Home ribbon.  This should result in the Data.Source.Error that we saw earlier.  To fix this click the Edit Queries on the Home ribbon, select the Folder query and change the file directory to the new folder that you made on your desktop.  It should look similar to the following:

    New Folder Image
    New Folder Image

    Once you’ve modified the Folder query, click Close & Apply on the Home ribbon and all your queries will now reload.  Success!!

    New Queries Loaded
    New Queries Loaded


    Hope this tutorial helps and solves some of the problems when moving data files and storing information for Power BI desktop.  Please Share if you like the tutorials. Thanks.

  • Measures – Intelligent Card Visual – Using DAX

    Measures – Intelligent Card Visual – Using DAX

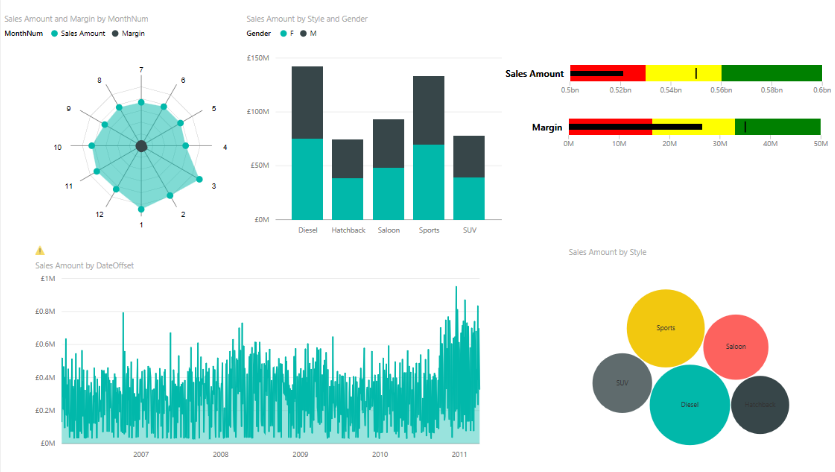
    As I have been exploring PowerBI and building dashboards I have noticed that often the visuals can obscure your data.  As you click on different visuals there is a need to highlight different pieces of data.  Take for example the following dashboard:

    Sample Visual Example
    Sample Visual Example

    Notice the different car types in the bar chart.  As you click on each vehicle type, Diesel, Hatchback, etc.. you expect the data to change accordingly.  In some cases it is helpful to present a card visual to show the user what you selected and any relevant data points you want to highlight.  For example if I select the Diesel vehicle type I may want to know the average sales amount, total sales in dollars, or number of units sold.  This is where we can build specific measures that will intelligently highlight selected data within your PowerBI visual.

    Here is a sample of what we will be building today:

    lets begin with starting with some data.  In honor of your news feed being bombarded with Pokemon Go articles lets enter some data on Pokemon characters.

    We will enter our data manually.  For a full tutorial on manually entering in data visit here.

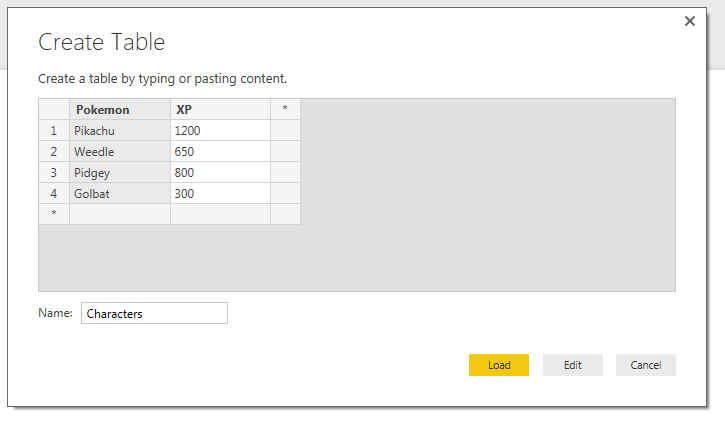
    Click the Enter Data button on the Home ribbon and enter the following information into the displayed table.

    Pokemon XP
    Pikachu 1200
    Weedle 650
    Pidgey 800
    Golbat 300

    Rename the table to Characters.  Once you are finished entering in the data it should look like the following:

    Create Table of Characters
    Create Table of Characters

    Click Load to continue.

    Start to examine your data by building a table visual.

    Table Visual
    Table Visual

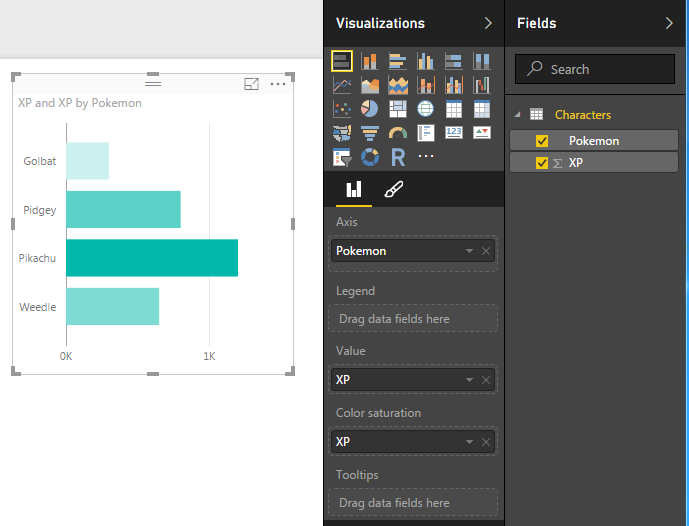
    Next add a Bar chart.

    Bar Chart
    Bar Chart

    Note: I added the XP column twice.  Once to the Value attribute and to the Color Saturation.  This enhances the look of your visual by coloring the bars with a gradient.  The largest bar will have the darkest color, and the smallest bar will have the lightest color.

    Next, we will begin building some measures.  The first measure will be a total of all the experience points (XP) for each character. Click the New Measure button on the Home ribbon and enter the following DAX expression:

    Total XP = Sum(Characters[XP])

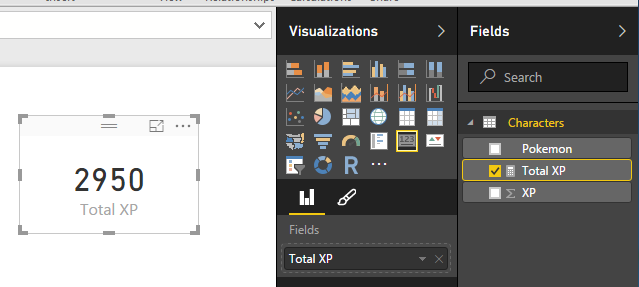
    Now, add a Card visual and add the new measure we created Total XP.

    Total XP Card Visual
    Total XP Card Visual

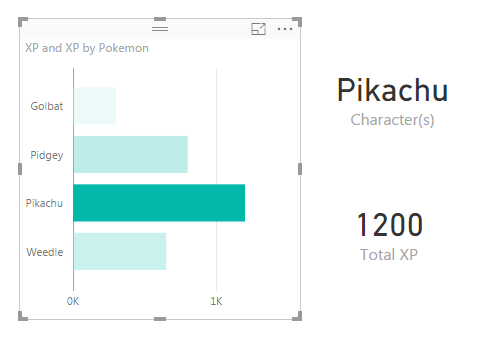
    This measure totals all the experience points for all the selected characters within the visual.  Since all characters are now selected the total XP for all characters is 2,950.

    The next, and final measure, will be the intelligent card.  For this measure we want to display the characters name when we select them in the bar chart.  Click the New Measure button on the Home ribbon and enter the following DAX expression:

    Character(s) = IF( DISTINCTCOUNT(Characters[Pokemon]) = 1 , FIRSTNONBLANK('Characters'[Pokemon],'Characters'[Pokemon]) , DISTINCTCOUNT('Characters'[Pokemon]) & " Selected")

    Update: As of Mid 2017 Microsoft introduced a new DAX expression called SELECTEDVALUE which greatly simplifies this equation.  Below is an example of how you would change the DAX equation to use SELECTEDVALUE.

    Selected = SELECTEDVALUE(  Characters[Pokemon],  DISTINCTCOUNT(  Characters[Pokemon]  )  &  " Selected" )

    Explanation of this measure:

    This measure first checks to see how many distinct items are in the column Pokemon of our dataset.  If there is only one selected character then we will display the FIRSTNONBLANK character, which will be the name of our selected character.  If there are more than one characters selected. The measure will count the number of characters selected and return a text string with the count and the word SelectedThus, showing us how many items have been selected.

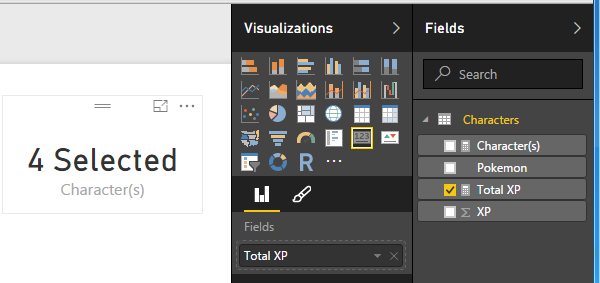
    Add the measure titled Character(s) to a card visual.

    Add Character Card Visual
    Add Character Card Visual

    We can now see that there are 4 characters selected.  Clicking on Pikachu in the bar chart resolves with the character’s name being displayed and the XP of Pikachu being displayed in the Total XP card visual.

    Selecting Pikachu
    Selecting Pikachu

    You can select multiple items by holding down Ctrl and clicking multiple items in the bar chart.

    Selecting Pikachu and Pidgey

    Well, that is it.  I hope you enjoyed this Pokemon themed tutorial.  Thanks for visiting.

    Want to learn more about PowerBI and Using DAX.  Check out this great book from Rob Collie talking the power of DAX.  The book covers topics applicable for both PowerBI and Power Pivot inside excel.  I’ve personally read it and Rob has a great way of interjecting some fun humor while teaching you the essentials of DAX.

  • Measures – Month to Month Percent Change

    Measures – Month to Month Percent Change

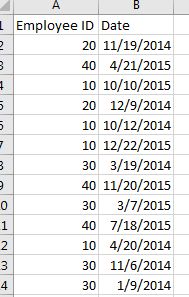
    I had an interesting comment come up in conversation about how to calculate a percent change within a time series data set.  For this instance we have data of employee badges that have been scanned into a building by date.  Thus, there is a list of Badge IDs and date fields.  See Example of data below:

    Employee ID and Dates
    Employee ID and Dates

    Looking at this data I may want to understand an which employees and when do they scan into a building over time.  Breaking this down further I may want to review Q1 of 2014 to Q1 of 2015 to see if the employee’s attendance increased or decreased.

    Here is the raw data we will be working with, Employee IDs Raw Data.  Our first step is to Load this data into PowerBI.  I have already generated the Advanced Editor query to load this file.  You can use the following code to load the Employee ID data:

    let
     Source = Csv.Document(File.Contents("C:\Users\Mike\Desktop\Employee IDs.csv"),[Delimiter=",", Columns=2, Encoding=1252, QuoteStyle=QuoteStyle.None]),
     #"Promoted Headers" = Table.PromoteHeaders(Source),
     #"Changed Type" = Table.TransformColumnTypes(#"Promoted Headers",{{"Employee ID", Int64.Type}, {"Date", type date}}),
     #"Sorted Rows1" = Table.Sort(#"Changed Type",{{"Date", Order.Ascending}}),
     #"Calculated Start of Month" = Table.TransformColumns(#"Sorted Rows1",{{"Date", Date.StartOfMonth, type date}}),
     #"Grouped Rows" = Table.Group(#"Calculated Start of Month", {"Date"}, {{"Scans", each List.Sum([Employee ID]), type number}})
    in
     #"Grouped Rows"

    Note: I have highlighted Mike in red because this is custom to my computer, thus, when you’re using this code you will want to change the file location for your computer.  For this example I extracted the Employee ID.csv file to my desktop. For more help on using the advanced editor reference this tutorial on how to open the advance editor and change the code, located here

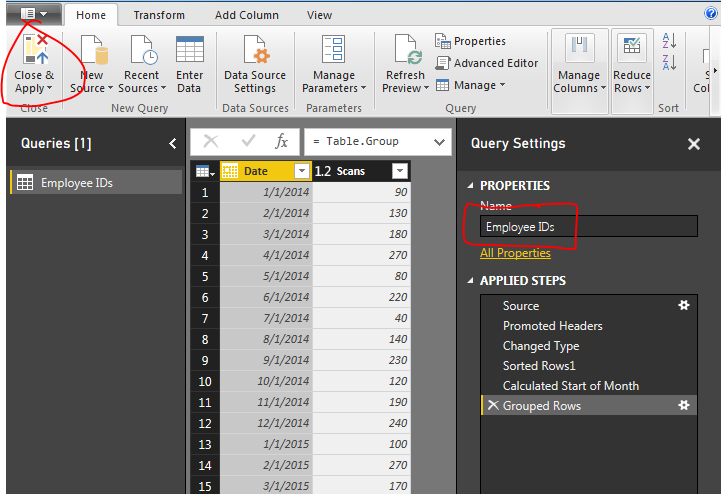
    Next name the query Employee IDs, then Close & Apply on the Home ribbon to load the data.

    Close and Apply
    Close and Apply

    Next we will build a series of measures that will calculate our time ranges which we will use to calculate our Percent Change (% Change) from month to month.


    Now build the following measures:

    Total Scans, sums up the total numbers of badge scans.

    Total Scans = SUM('Employee IDs'[Scans])

    Prior Month Scans, calculates the sum of all scans from the prior month.  Note we use the PreviousMonth() DAX formula.

    Prior Month Scans = CALCULATE([Total Scans], PREVIOUSMONTH('Employee IDs'[Date]))

    Finally we calculate the % change between the actual month, and the previous month with the % Change measure.

    % Change = DIVIDE([Total Scans], [Prior Month Scans], blank())-1

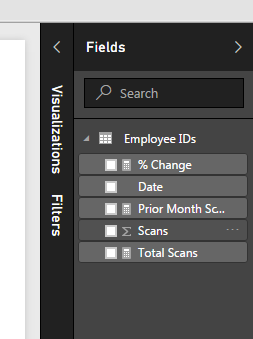
    Completing the new measures your Fields list should look like the following:

    New Measures Created
    New Measures Created

    Now we are ready to build some visuals.  First we will build a table like the following to show you how the data is being calculated in our measures.

    Table of Dates
    Table of Dates

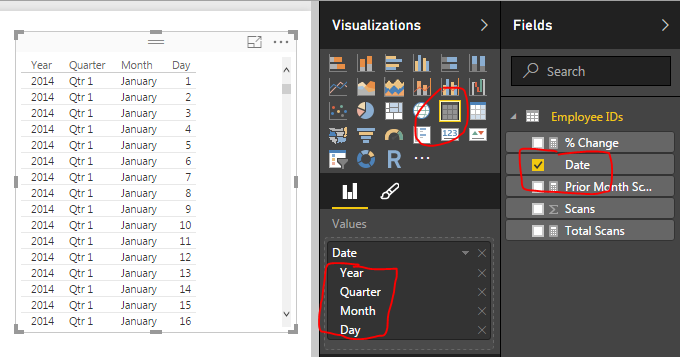
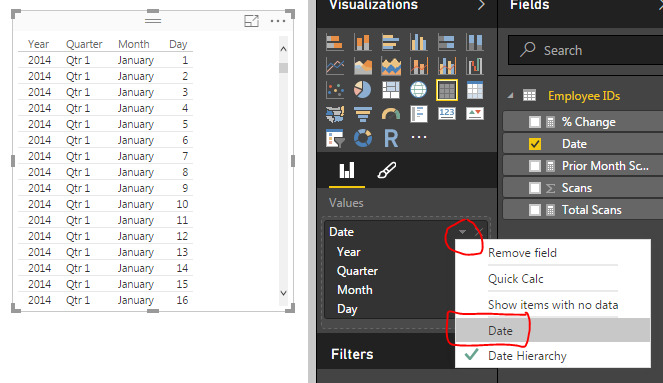
    When we first add the Date field to the chart we have a list of dates by Year, Quarter, Month, and Day.  This is not what we want.  Rather we would like to just see the actual date values.  To change this click the down arrow next to the field labeled Date and then select from the drop down the Date field.  This will change the date field to be viewed as an actual date and not a date hierarchy.

    Change from Date Hierarchy
    Change from Date Hierarchy

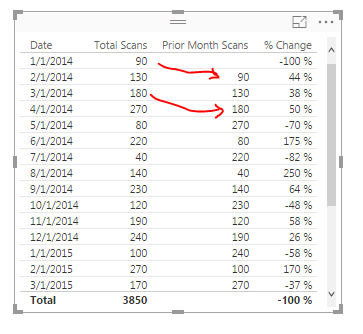
    Now add the Total Scans, Prior Month Scans, and % Change measures.  Your table should now look like the following:

    Date Table
    Date Table

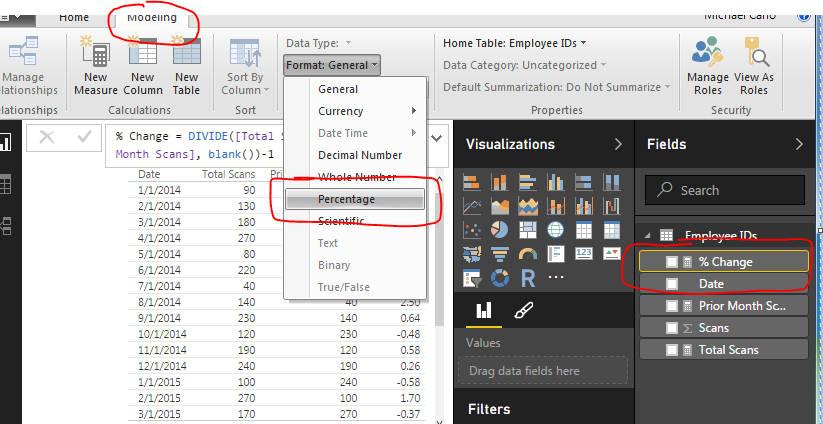
    The column that has % Change does not look right, so highlight the measure called % Change and on the Modeling ribbon change the Format to Percentage.

    Change Percentage Format
    Change Percentage Format

    Finally now note what is happening in the table with the counts totaled next to each other.

    Final Table
    Final Table

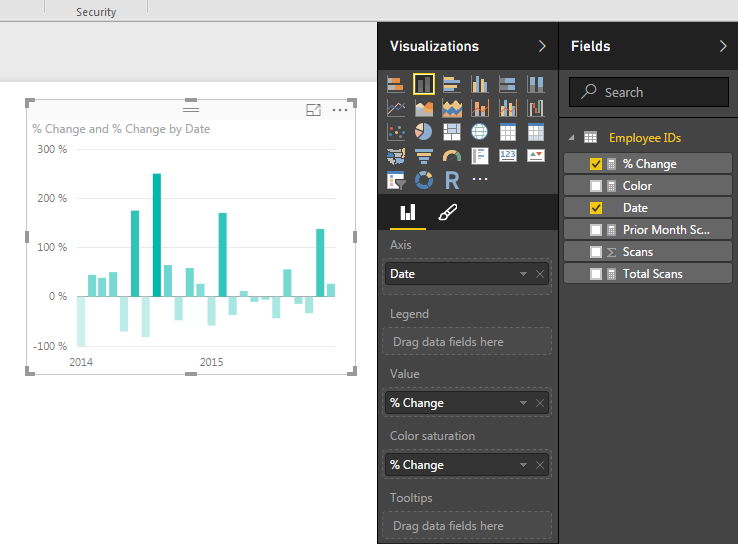
    Now adding a Bar chart will yield the following.  Add the proper fields to the visual.  When your done your chart should look like the following:

    Add Bar Chart
    Add Bar Chart

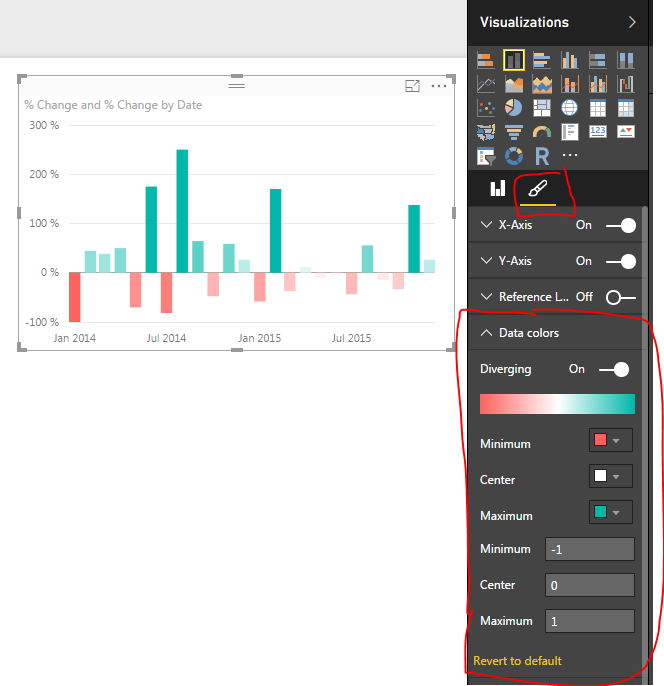
    To add a bit of flair to the chart you can select the Properties button on the Visualizations pane.  Open the Data Colors section change the minimum color to red, the maximum color to green and then type the numbers in the Min, Center and Max.

    Changing Bar Chart Colors
    Changing Bar Chart Colors

    Well, that is it, Thanks for stopping by.  Make sure to share if you like what you see.  Till next week.

    Want to learn more about PowerBI and Using DAX.  Check out this great book from Rob Collie talking the power of DAX.  The book covers topics applicable for both PowerBI and Power Pivot inside excel.  I’ve personally read it and Rob has a great way of interjecting some fun humor while teaching you the essentials of DAX.

  • Loading Data From Folder

    Loading Data From Folder

    Let me setup a scenario for you.  You get a data file from an automated system, it has the same number of columns but the data changes for every new file.  Being the data savvy person that you are you’ve spent some time working in excel to make a template where you can copy your new data into and then automatically all your equations and graphs magically work.  You pat your self on the back and happily send out your fantastic report to everyone you know.  Then tomorrow when the data comes to you again you repeat the same process over again.  Still enamored by your awesome report, you send it out again knowing you have saved your self so much time not having to do the analysis or creation of your reports over and over again.  Now, fast forward 3 months.  That stupid report shows up again, and now you have to lug all that data from file to file and begrudgingly you sent out your report.  Thus, is the store of the analyst.  You love data, but you hate it as well.  Well in this tutorial I’ll show you how to remove some of the pain of that continual data loading process by loading new data from a folder.

    My previous post (found here) talks about loading data from a folder.  In this tutorial we will add some logic to this method that will look at a folder but only load the most recently added item from that folder.

    Data for this tutorial is located this link Monthly Data Zip File.  This data in the ZIP file is a monthly data sample from Feb 2016 to April of 2016.

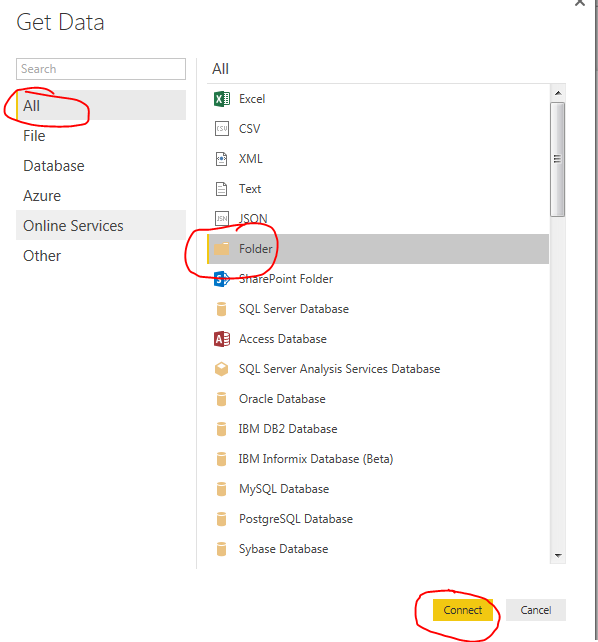
    Download the zip file mentioned above and extract the Monthly Data folder down to your desktop.  Open up PowerBI Desktop and click on the Get Data button and select All on the left side.  Click on the item labeled Folder and click Connect to continue.

    Get Data from Folder
    Get Data from Folder


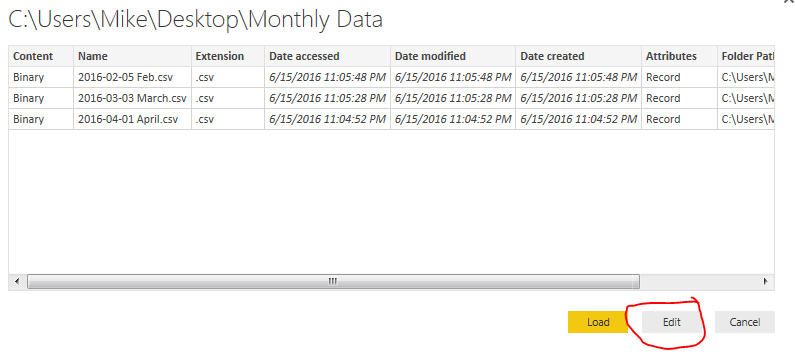
    Select the newly unzipped Monthly Data folder that should be on your desktop.  Click OK to continue. Upon opening that folder location you will be presented with the multiple files.  Click Edit to edit the query.

    Edit Query for Folder Load
    Edit Query for Folder Load

    Now you are in the Query Editor.  This is where the fancy query editing will work to our advantage.  We could load all the data into one large query.  However, depending on the size of your data sets or how you want to report your data this may not always be desirable.  Instead you may only want data from April, then May when the new data is sent next month.

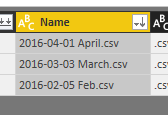
    Thus, our first step to start pairing down the data will be to first filter the files in sequential order.  In this case because I have named the files with a Year-Month-Day format I can sort the files according to their names.

    Note:  When using PowerBI desktop it is a good practice to name the files  beginning with a YYYY-MM-DD file name.  This makes it really easy when sorting and ingesting information into PowerBI.  I have used other columns of information such as Date Accessed or Date Created before but have gotten inconsistent results as these dates can change depending on when a file was moved or copied from one place to another.

    Click the drop down next to Name and sort the files in Sort Descending.

    Name in Descending Sort
    Name in Sort Descending

    This places the files with the most recent file at the top of the list.

    File List in Descending Order
    File List in Descending Order

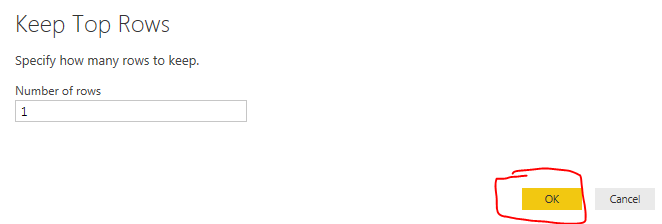
    Next click on the Keep Rows button on the Home ribbon, select Keep Top Rows.

    Keep Top Rows
    Keep Top Rows

    Enter the number when the popup appears.  Click OK to continue.

    Keep Top Rows Menu
    Keep Top Rows Menu

    Now you’ll notice you have only one file selected which is our latest file from April.  Click the Load File button found in the Content column.

    Load File Button
    Load File Button

    We have completed the activities in the Query Editor and can now load the data.  Click Close & Apply found on the Home ribbon.  All our April data has loaded.  by making a simple table we can now see all the data that was just loaded.

    Loaded Data from April
    Loaded Data from April

    Now we will remove some data from our desktop folder labeled monthly data.  Open the folder on the desktop labeled Monthly Data and delete the filed labeled 2016-04-01 April.  You should now have a folder labeled Monthly Data with only two files in it, one for Feb and one for March.

    Two Files Left
    Two Files Left

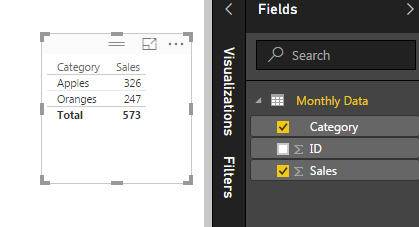
    Return back to Power BI Desktop and click the Refresh button on the Home ribbon.  Notice now how all our data has changed.  We are now looking at the March data because it is the most recent file in our folder based on the file name.

    March Data Load
    March Data Load

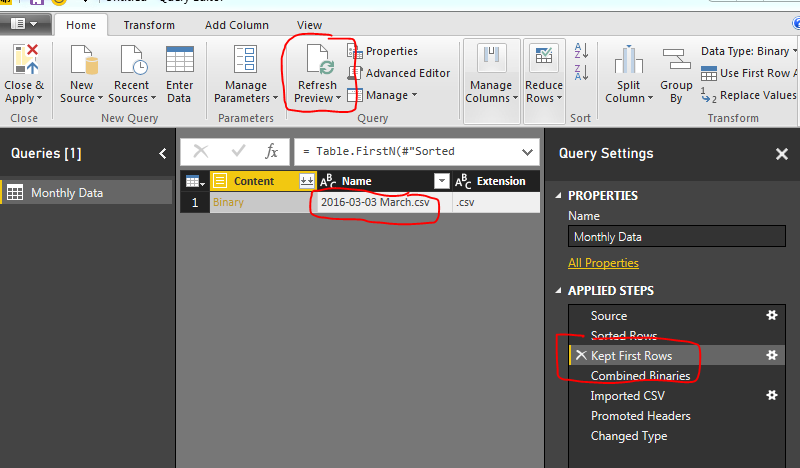
    To verify this we open the query editor (Click the Edit Queries on the Home ribbon).  Click Refresh Preview on the Home ribbon and finally select the Applied Step called Kept First Rows.  This will reveal the month of March as our data source.

    Month of March Loaded
    Month of March Loaded

    Now, every time you add a new file to our folder and refresh PowerBI the latest file (based on the naming convention we talked about earlier) will always be loaded.

    Note: This method works great when your data source is coming from an automated system.  The file format must always be the same for this to work reliability.  If the file naming convention changes, or the number of columns or location of those columns changes then the query will most likely fail.

    Good luck and thanks for following along.

  • Measures – Dynamic Percent Change – Using DAX

    Measures – Dynamic Percent Change – Using DAX

    This tutorial will produce a measure that will dynamically calculate a percent change every time an item is selected in a visual.  The previous tutorial can be found here.  In the previous tutorial we calculated the percent change between two time periods, 2014 and 2013.  In practice it is not always desirable to force your measure to only look at two time periods.  Rather it would be nice that your measure calculations change with changes in your selections on visuals.  Thus, for this tutorial we will add some dynamic intelligence to the measures. Below is an example of what we will be building:

    First here is the data we will be using.  This data is the same data source as used in the previous % change tutorial.  To make things easy I’ll give you the M code used to generate this query.  Name this query Auto Production.

    let
     Source = Web.Page(Web.Contents("https://en.wikipedia.org/wiki/Automotive_industry")),
     Data0 = Source{0}[Data],
     #"Removed Columns" = Table.RemoveColumns(Data0,{"Change", "Source"}),
     #"Changed Type" = Table.TransformColumnTypes(#"Removed Columns",{{"Production", Int64.Type}, {"Year", Int64.Type}})
    in
     #"Changed Type"

    Note: the code shown above should be added as a blank query into the query editor.  Add the code using the Advanced Editor.  Another tutorial showing you how to add advanced editor code is here

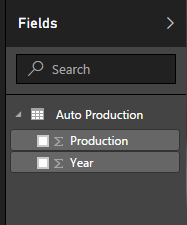
    Once you’ve loaded the query called Auto Production.  The Field list should look like the following:

    Production
    Auto Production

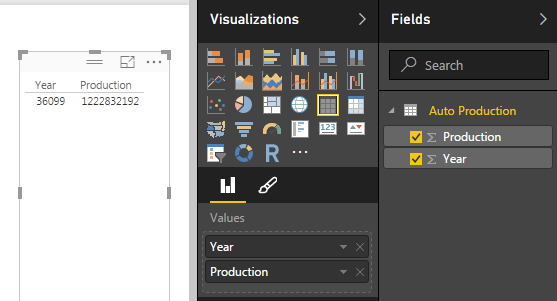
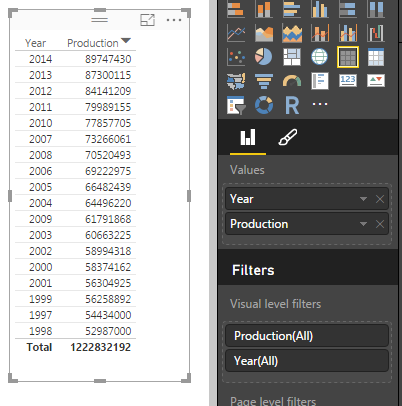
    Next add a Table with Production and Year.  this will allow us to see the data we are working with.  When you initially make the table the Year and Production columns are automatically summed, thus why there is one number under year and production.

    Table of Data
    Table of Data

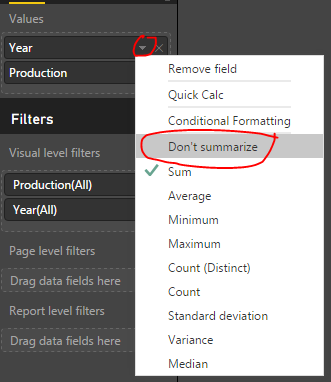
    Rather we want to see every year and the production values for each of those years.  To change this view click on the triangle in the Values section of the Visualizations pane.  This will reveal a list, in this list it shows that our numbers are aggregated by Sum change this to Don’t Summarize.

    Change to Don't Summarize
    Change to Don’t Summarize

    Now we have a nice list of yearly production levels with a total production at the bottom of our table.

    Table of Production Values by Year
    Table of Production Values by Year

    Next we will build our measure using DAX to calculate the percent changes by year.  Our Calculation for % change is the following:

    % Change  =  ( New Value / Old Value ) - 1

    Below is the DAX statement we use as our measure.  Copy the below statement into a new measure.

    % Change = 
    DIVIDE(
     CALCULATE(
     SUM('Auto Production'[Production]), 
     FILTER('Auto Production','Auto Production'[Year]=MAX('Auto Production'[Year])
     )
     ), 
     CALCULATE(
     SUM('Auto Production'[Production]),
     FILTER('Auto Production','Auto Production'[Year]=MIN('Auto Production'[Year])))
    ,0) 
    - 1

    I color coded the DAX expression between the two equations to show which parts correlated.  Note we are using the DIVIDE function for division.  This is important because if we run into a case where we have a denominator = 0 then an error is returned.  Using DIVIDE allows us to return a zero instead of an error.

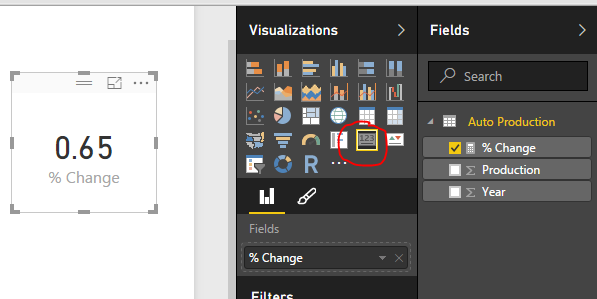
    Next add our newly created measure as a Card.

    Add Card
    Add Card

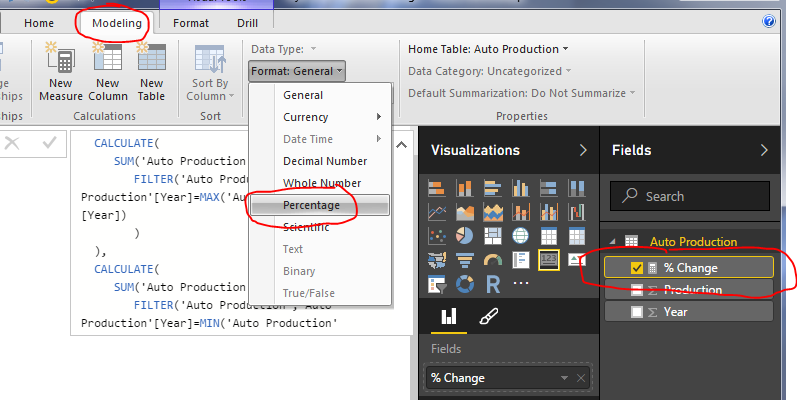
    Change the % Change measure format from General to Percentage, do this on the Modeling ribbon under Formatting.

    Change Measure Formatting
    Change Measure Formatting

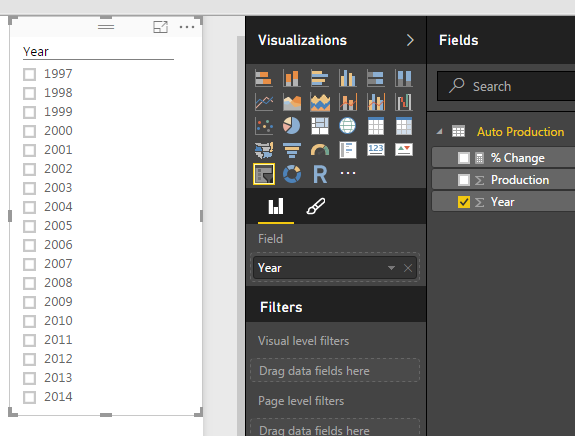
    Next add a slicer for Year. 

    Slicer for Year
    Slicer for Year

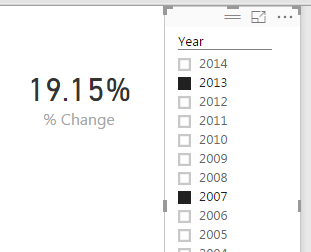
    Now you can select different year and the % change will automatically change based on our selection.  The % change will always select the smallest year’s production and the largest year’s production to calculate the % Change.   By Selecting the Year 2013 and 2007, the percent change is 19.15%.  The smallest year is 2007 and the largest is 2013.

    Selecting Two Years
    Selecting Two Years

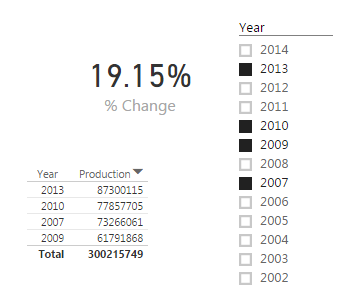
    If we select a year between 2013 and 2007 the measure will not change.

    Multiple Years Selected
    Multiple Years Selected

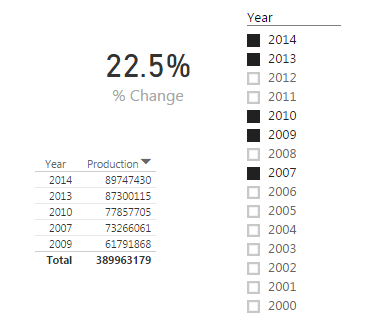
    The measure will only change when the starting and ending years are changed.  By selecting the year 2014, the measure finally changes.

    Selecting Additional Year
    Selecting Additional Year

    Pretty cool wouldn’t you say?  Thanks for taking the time to walk through another tutorial with me.

    Want to learn more about PowerBI and Using DAX.  Check out this great book from Rob Collie talking the power of DAX.  The book covers topics applicable for both PowerBI and Power Pivot inside excel.  I’ve personally read it and Rob has a great way of interjecting some fun humor while teaching you the essentials of DAX.
  • Query Editor – Editing M Code

    Query Editor – Editing M Code

    In this tutorial we’ll learn how to copy and paste queries to and from the Query Editor.  When your working in Power BI Desktop often you will need to share and model the data before it can be applied to the visual.  In my experience you’ll need to add a calculated column or break out a date such as 1/5/2016 into the the Year 2016 or Month 01, components to properly display a visual.

    We will start off with from a prior example where we build a shaded region map.  The tutorial to create this Power BI Desktop file is located here.

    If you want to cheat and download the final PBIX file you can download and open the zipped file here: Regional Filled Map Example

    This file was made in Power BI Desktop April 2016 version, 2.34.4372.322, download the latest version from Microsoft Here.

    Open the zip file that you downloaded and extract the file inside labeled Regional Filled Map Example.  Open the file.  Once you’ve opened the file on page 1 of the you see a map of the united states that looks similar to the following.

    Opened File with Map
    Opened File with Map

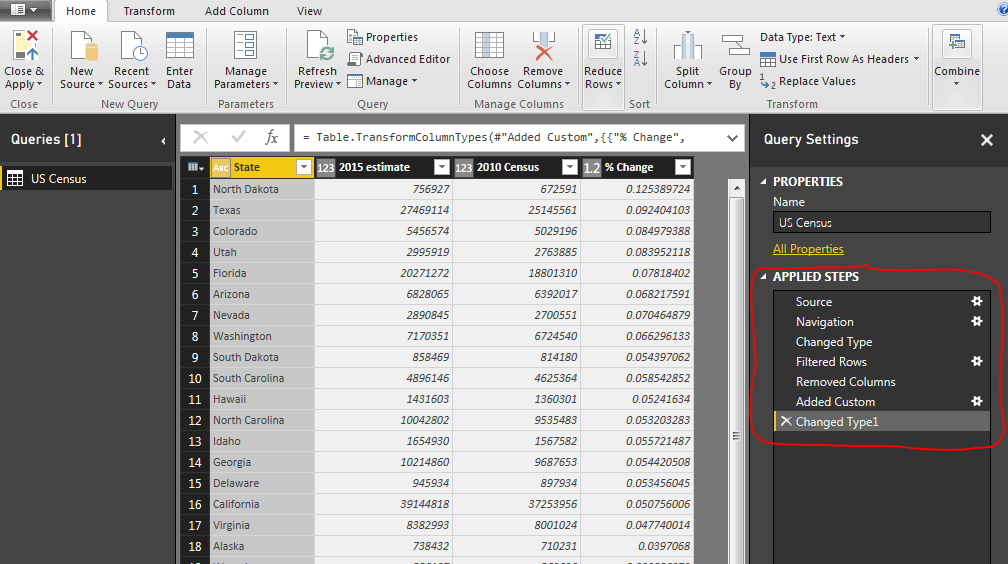
    Now we well enter the query editor.  Click on the Edit Queries on the Home ribbon.  You opened the Query Editor.  In this window we shape and model the data so we can properly visualize it on the pages.  Couple of things to notice here.  Every time you press a button on the ribbon, the query editor generates an Applied Step.  Each step writes a line of M code which transforms the data as it is loaded into the computer’s memory.   In this case we have (7) seven steps starting at Source  and ending with Changed Type1.

    Query Editor Revealing Applied Steps
    Query Editor Revealing Applied Steps

    We want to expose the code that is begin generated at every step behind the scenes.  Click on the View ribbon and then click on the button called Advanced Editor.

    Query Editor - Advanced Editor
    Query Editor – Advanced Editor

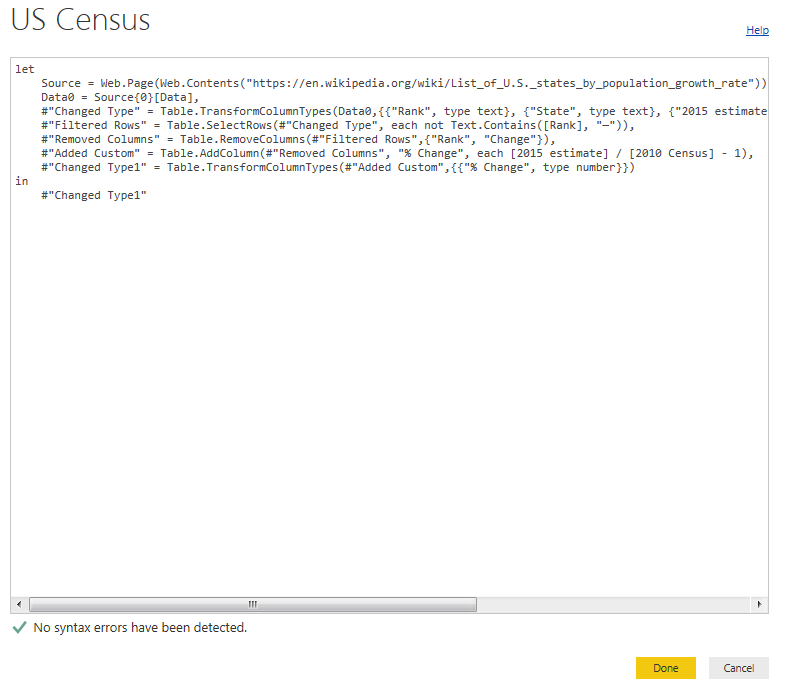
    Opening this window reveals the M language code that is generating each Applied Step we saw earlier.

    Note: some of the steps we saw earlier such as Filtered Rows had a space in it. In the query editor any applied step had a space in the name gets the added #”” around the applied step name.  Thus, in the query editor Filter Rows would be #”Filtered Rows”.  The hashtag and the quotations define the complete variable.  If you changed the name of the applied step to FilteredRows, with no space.  In the Advanced Editor you’d only see the step labeled as FilterRows, no hastag or quotations needed. 

    Now that the M language is revealed you can made modifications to the code.  In cases where you want to make a function you would do so in the Advanced Editor.  For our example today select all the code and copy it to the clipboard using the keyboard shortcut CTRL+C.  Click Done to close the window.

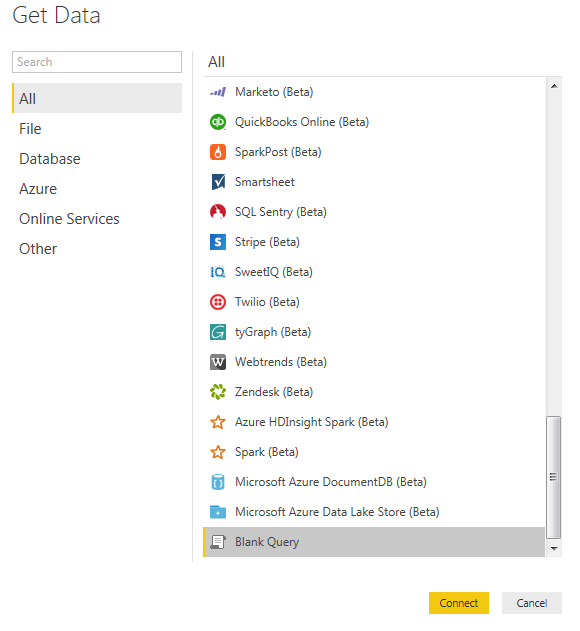
    Now lets copy that code into a brand new query.  Click the Home ribbon, then click New Source, scroll all the way to the bottom of the list and select Blank Query. Click Connect to start a blank query.

    Get Data - Blank Query
    Get Data – Blank Query

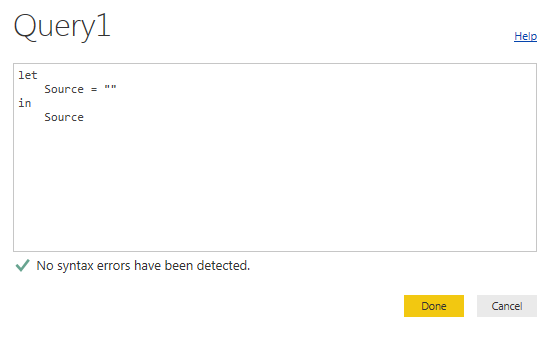
    A new Query will now open up.  Click the View ribbon, then click Advanced Editor.  A blank editor window will open.

    Blank Query
    Blank Query

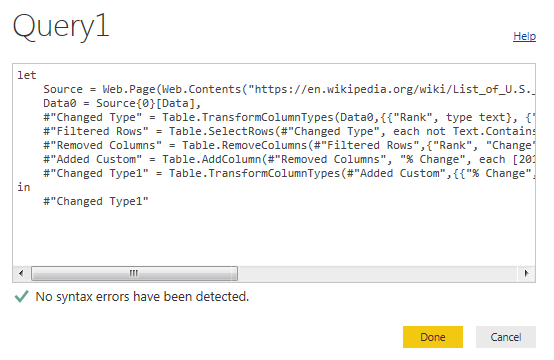
    Paste the code we copied earlier into this window.  Now the new Query1 should look like the following:

    Paste Code in to Advance Editor
    Paste Code in to Advance Editor

    Click Done and the new query will now load.  It is that simple, now we have two identical queries.

  • Measures – Calculating a Sum

    Measures – Calculating a Sum

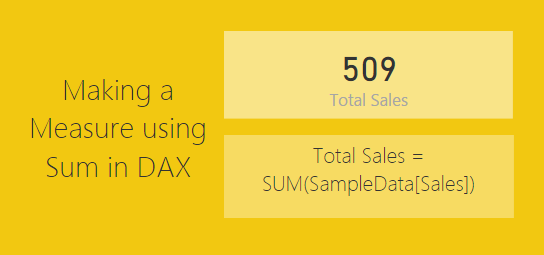
    Often there are times when you will want to display a totals.  Using measures to calculate a total are extremely easy to use.  The power of using a measure is when you are slicing and selecting different data points on a page.  As you select different data points the sum will change to reflect the selected data.  See sample of what we will be building today below.

    Materials for this Tutorial are:

    • Power BI Desktop (Iā€™m using the April 2016 version, 2.34.4372.322) download the latest version from Microsoft Here.
    • CSV file with data, download SampleData in CSV format.

    To load the CSV file into Power BI Desktop you can follow along in this tutorial, Import CSV File into PowerBI Desktop.

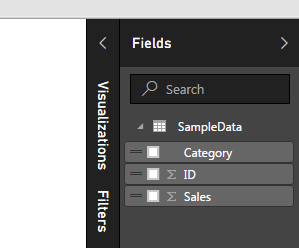
    Once you’ve loaded the CSV file into Power BI Desktop your fields items should resemble the following:

    Fields List
    Fields List

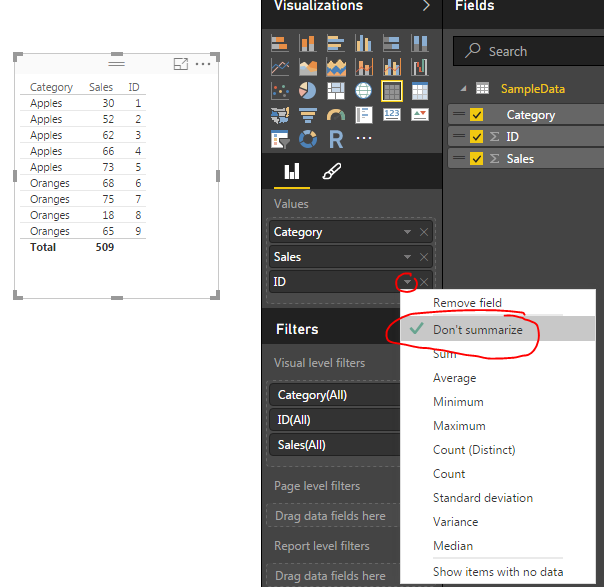
    Add the Table visual from the visualizations bar into the Page area.  Drag the following items into the newly created table visualization, Category, Sales, and ID.  Your table should look like the following:

    Table of Data
    Table of Data

    Click the Triangle next to the ID column under the Values section in the Visualization bar.  A menu will appear, select the top item labeled Don’t Summarize.

    Do not Summarize Data for ID
    Do not Summarize Data for ID

    This reveal all the unique items in our table of data.  Now, we will create our measures for calculating totals.  On the Home ribbon click the New Measure button.  Enter in the following DAX expression.

    Total Sales = SUM(SampleData[Sales])

    Note: In the equation above everything before the equals sign is the name of the measure.  All items after the equation sign is the DAX expression.  In this case we are taking a SUM of all the items in the Table SampleData from the column labeled Sales.

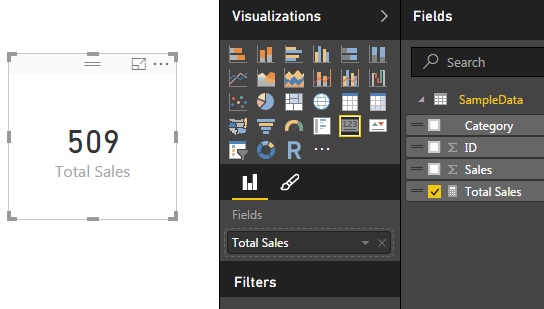
    This will total all the items in the sales column.  Click on the Card visual and add the Total Sales measure to the card.  Your new card should look like the following.

    Total Sales Measure
    Total Sales Measure

    Next we will add a bar chart to show how the data changes when the user selects various items on the page to filter down to different results.  Add the Stacked Bar Chart to the page.  In the Axis & Legend selectors add the Category column, and add the Sales column to the Value selector.  This will yield the following bar chart.

    Bar Chart
    Bar Chart

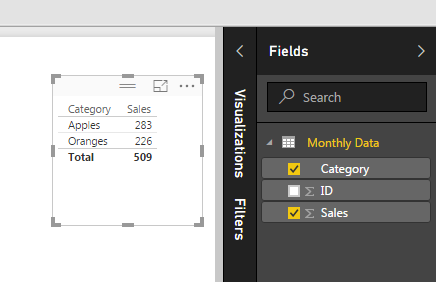
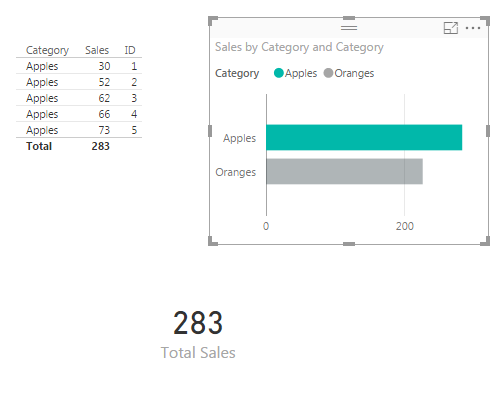
    Now we can click on items in the bar chart to see how the table of data and the Total Sales changes for each selection.  Clicking on the bar labeled Apples provides a total sales of 283, and clicking on the Oranges shows a total of 226.

    Apples Bar Selected
    Apples Bar Selected

    Our measure is complete.  Now we can select different visualizations and each time we do PowerBI is filtering the table of available data down to a smaller subset.

    Pro Tip: When building different visuals and measures often it is helpful to have a table showing what data is being filtered when you interact with the different visuals.  Sometimes the filters that you are applying by clicking on a visual interact in non-expected ways.  The table helps you see these changes.

    We have now completed a measure that is calculating a total of all the numeric values in one column.

    Want to learn more about PowerBI and Using DAX.  Check out this great book from Rob Collie talking the power of DAX.  The book covers topics applicable for both PowerBI and Power Pivot inside excel.  I’ve personally read it and Rob has a great way of interjecting some fun humor while teaching you the essentials of DAX.